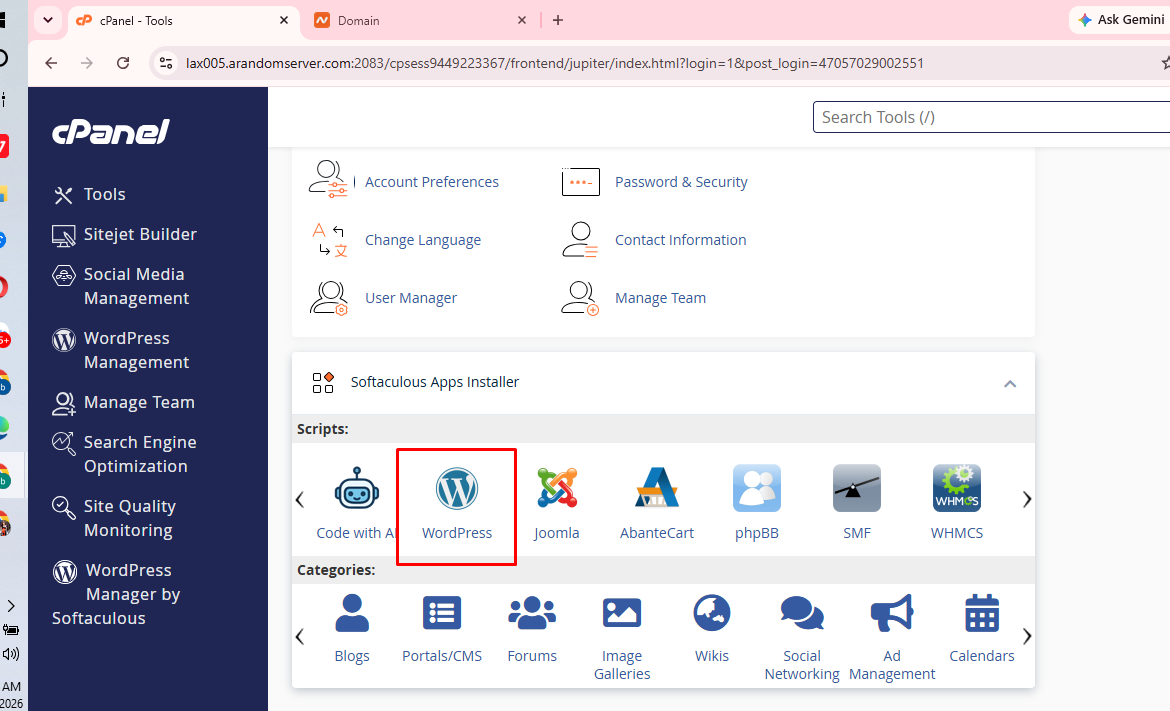
After purchasing your HawkHost hosting plan, the next important step is connecting your domain name to your hosting account. Without this connection, visitors won’t be able to access your website using your domain.
Fortunately, connecting a domain to HawkHost is easier than many beginners expect. In most cases, all you need to do is update your domain’s nameservers or DNS records. Once the changes have propagated across the internet, your domain will point to your HawkHost hosting account and your website will be ready to go.
In this guide, you’ll learn two different methods for connecting a domain to HawkHost, discover which method is best for beginners, troubleshoot common problems, and learn what to do after your domain is connected.
Tip: If you’re new to web hosting, we strongly recommend using the nameserver method. It’s the simplest option and automatically manages most DNS settings for you.
What Does It Mean to Connect a Domain to HawkHost?
A domain name is your website’s address on the internet, such as:
- yourwebsite.com
- example.net
- mybusiness.org
Your hosting account is where all of your website’s files, images, databases, and emails are stored.
Connecting your domain tells the internet where those website files are located.
Without this connection:
- Visitors can’t reach your website.
- WordPress won’t load correctly.
- Email addresses using your domain won’t work.
- SSL certificates may not activate properly.
A simple way to understand the process is:
Domain Name
      ↓
Nameservers (or DNS Records)
      ↓
HawkHost Hosting Server
      ↓
Your Website
Think of your domain as your home’s street address and your hosting account as the actual house. The nameservers act like the postal service, directing visitors to the correct location.
Before You Start
Before connecting your domain, make sure you have completed the following checklist.
✅ Purchased a HawkHost hosting plan.
✅ Registered a domain name.
✅ Have access to your domain registrar account.
✅ Can log in to your HawkHost Client Area.
✅ Received your HawkHost welcome email.
Related Guides :
Method 1: Connect a Domain Using HawkHost Nameservers ⭐ (Recommended)
For most beginners, changing your domain’s nameservers is the easiest and most reliable method.
Instead of configuring individual DNS records manually, HawkHost automatically manages the necessary DNS settings.
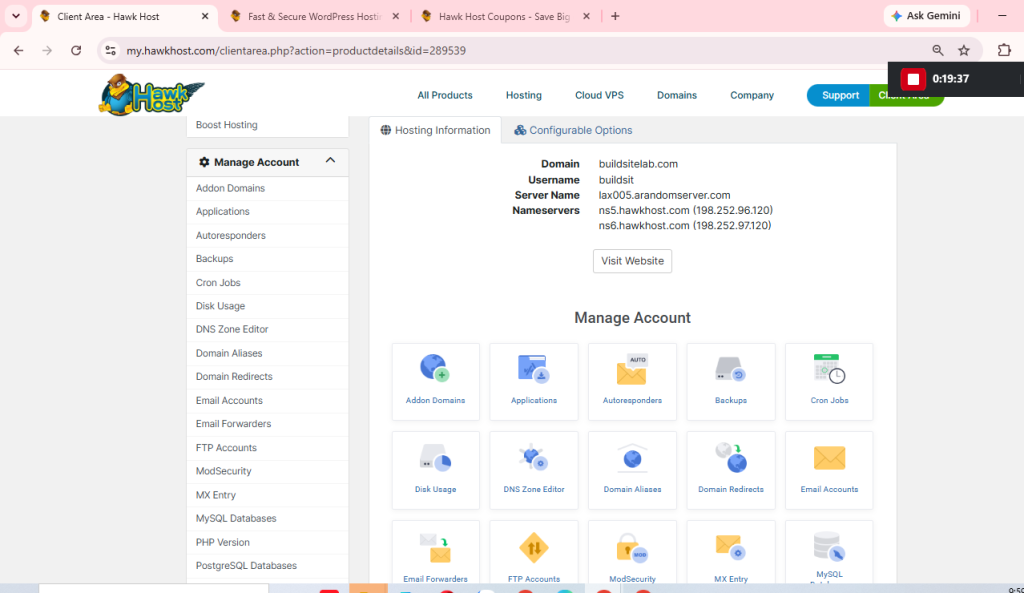
Step 1: Log in to Your HawkHost Client Area
Sign in to your HawkHost account using your registered email address and password.
After logging in, open My Services and select your hosting account.
Step 2: Find Your HawkHost Nameservers
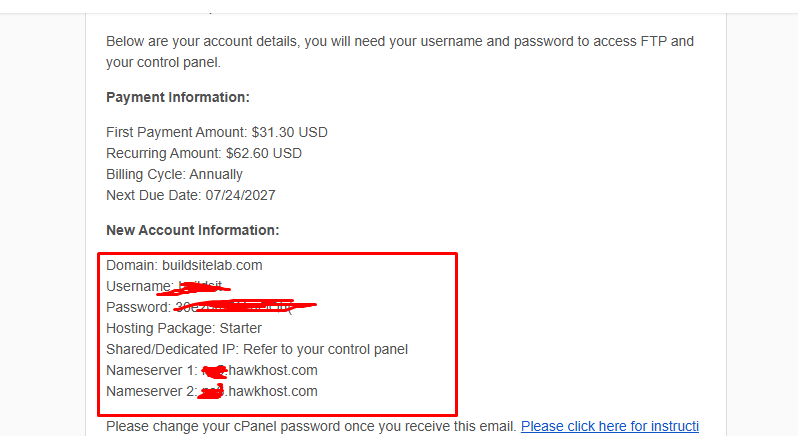
Inside your hosting account or welcome email, locate your nameservers.
They usually look similar to:
ns1.hawkhost.com
ns2.hawkhost.com
Depending on your server, the names may be slightly different.
Always use the nameservers provided specifically for your hosting account.
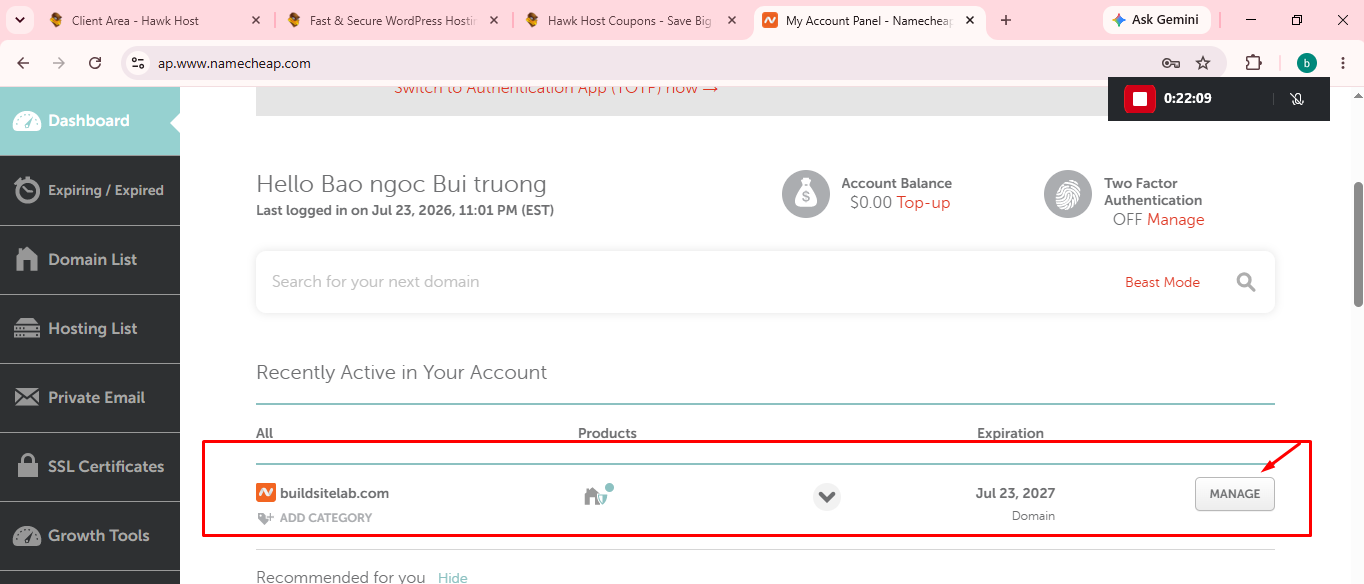
Step 3: Log in to Your Domain Registrar
Next, log in to the company where your domain name is registered.
Examples include:
- Namecheap
- GoDaddy
- Porkbun
- Dynadot
- Squarespace Domains
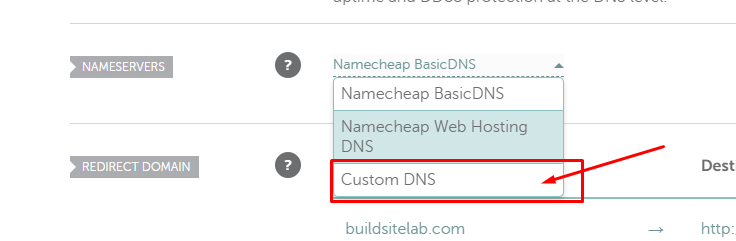
Open the DNS or Nameserver management page.
Step 4: Replace the Existing Nameservers
Delete the current nameservers.
Replace them with the HawkHost nameservers provided in your account.
For example:
Old
ns1.oldhost.com
ns2.oldhost.com

New
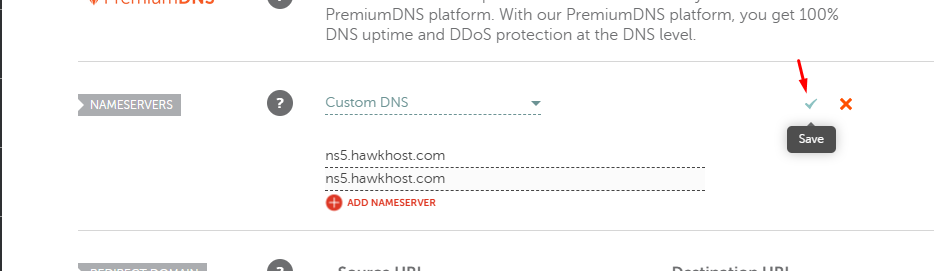
ns1.hawkhost.com
ns2.hawkhost.com
Double-check for typing mistakes before saving.
Even one incorrect character can prevent your website from working.
Step 5: Save Your Changes
Click Save, Update, or Change Nameservers, depending on your registrar.
Your registrar will confirm that the changes have been accepted.
At this point, your domain has been updated—but it won’t work immediately.
Step 6: Wait for DNS Propagation
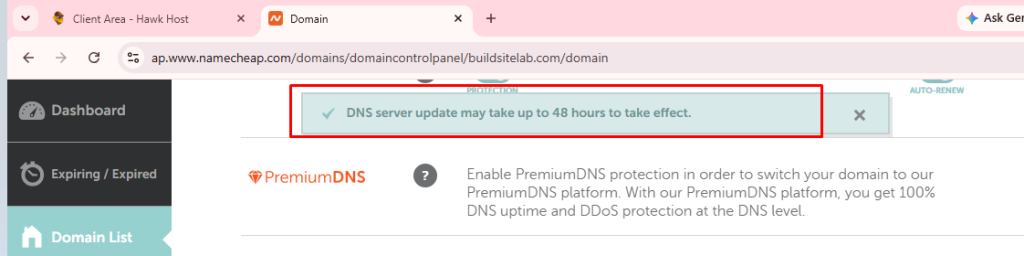
DNS changes need time to spread across internet servers worldwide.
This process is called DNS propagation.
Typical propagation times:
- 5–30 minutes (best case)
- 2–6 hours (common)
- Up to 24 hours (normal)
- Up to 48 hours (rare)
During this period, some visitors may still see your old website while others see the new one.
This is completely normal.
Method 2: Connect a Domain Using DNS Records
Some advanced users prefer keeping their existing nameservers and changing only specific DNS records.
Instead of replacing nameservers, you’ll manually edit records such as:
- A Record
- CNAME
- MX Records
- TXT Records
This method is commonly used when:
- You’re using Cloudflare.
- You manage custom DNS settings.
- You have multiple services connected to the same domain.
- You don’t want to replace existing nameservers.
For most beginners, however, changing nameservers remains the easiest approach.
Understanding the Most Common DNS Records
A Record
An A Record points your domain directly to your hosting server’s IP address.
Example:
example.com
↓

192.0.2.100
CNAME Record
A CNAME allows one hostname to point to another.
It’s commonly used for:
- www.example.com
- Subdomains
- Verification records
MX Record
MX Records control where your email is delivered.
If you use external email services such as Google Workspace or Microsoft 365, you’ll often keep custom MX records even after connecting your domain to HawkHost.
How to Check If Your Domain Is Connected
After updating your DNS settings, you should verify that everything is working correctly.
Here are several ways to check.
Visit Your Website
The easiest method is simply opening your domain in a browser.
If your website loads correctly, the connection is likely complete.
Check DNS Propagation
Online DNS propagation checkers allow you to see whether your updated nameservers have spread across different regions.
These tools display DNS results from multiple countries, helping you confirm whether the changes have fully propagated.
Check WHOIS Information
WHOIS tools can sometimes show the nameservers currently assigned to your domain.
If you see the HawkHost nameservers listed, your update has been applied successfully.
Check Inside cPanel
Log in to cPanel and open the Domains section.
If your domain appears correctly, it has likely been connected successfully.
Related Guide: How to Access HawkHost cPanel
How to Connect a GoDaddy Domain to HawkHost
If your domain is registered with GoDaddy:
- Log in to your GoDaddy account.
- Open My Products.
- Select your domain.
- Click DNS.
- Open the Nameservers section.
- Choose Custom Nameservers.
- Enter your HawkHost nameservers.
- Save your changes.
DNS propagation may take several hours.
How to Connect a Namecheap Domain to HawkHost
For Namecheap users:
- Sign in to Namecheap.
- Go to Domain List.
- Click Manage.
- Under Nameservers, choose Custom DNS.
- Enter the HawkHost nameservers.
- Save the changes.
Namecheap usually updates nameserver changes quickly, although worldwide propagation still takes time.
How to Connect a Cloudflare-Managed Domain
If your domain uses Cloudflare, you generally won’t replace Cloudflare’s nameservers.
Instead:
- Keep the existing Cloudflare nameservers.
- Update your A Record to point to your HawkHost server IP.
- Verify that the proxy settings are configured correctly.
- Save the DNS records.
This method allows you to continue using Cloudflare’s CDN, caching, and security features while hosting your website on HawkHost.
Because Cloudflare configurations vary depending on your setup, we’ll cover this process in more detail in a dedicated guide.
Common Problems After Connecting a Domain
Although the process is straightforward, a few common issues can prevent your website from working immediately.
Domain Not Working
This is often caused by DNS propagation.
Wait a few hours before making additional changes.
Wrong Nameservers
Verify that you’ve entered the correct HawkHost nameservers exactly as provided.
Even a small typo can prevent the connection.
DNS Propagation Delay
DNS propagation is completely normal.
Avoid repeatedly changing your nameservers while waiting, as this can delay the process further.
SSL Certificate Not Working
SSL certificates often require the domain to point correctly to your hosting account before they can be issued.
If HTTPS isn’t working immediately, wait until DNS propagation has completed.
Website Still Shows the Old Host
Your browser or internet provider may still be using cached DNS information.
Try:
- Refreshing your browser.
- Clearing DNS cache.
- Testing from another device.
- Waiting a little longer.
Domain Status Shows “Pending”
Some registrars temporarily display a pending status while processing nameserver changes.
This usually resolves automatically.
What to Do After Connecting Your Domain
Once your domain is connected successfully, you’re ready to start building your website.
Here are the next steps we recommend.
Install WordPress
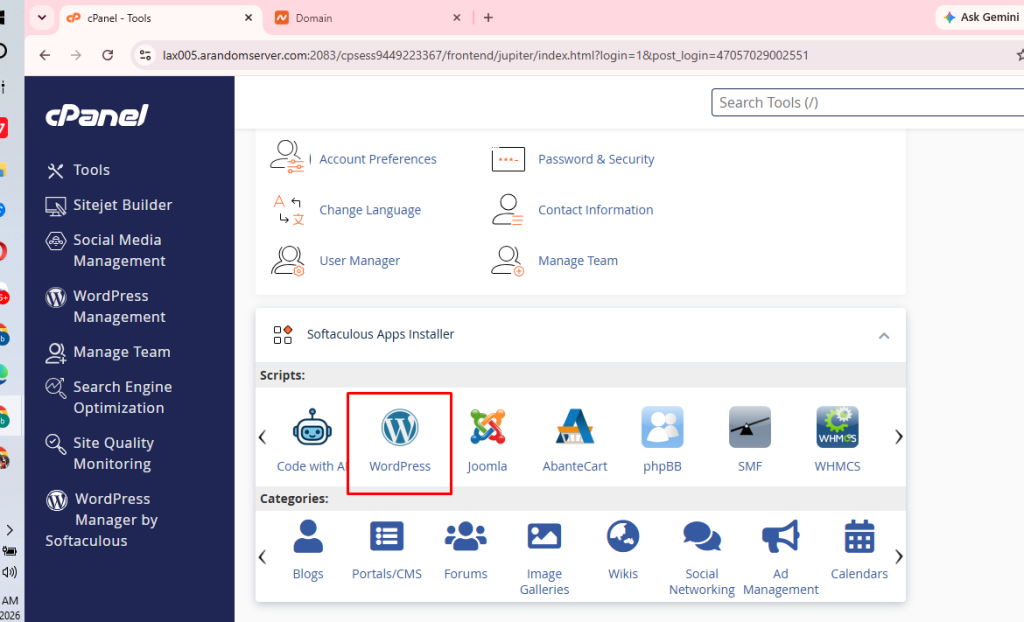
Launch your website using the one-click WordPress installer.
Related Guide: → How to Install WordPress on HawkHost
Install SSL
Enable HTTPS to secure your website and improve visitor trust.
Related Guide: → How to Install Free SSL on HawkHost
Create Email Accounts
Create professional email addresses using your domain.
Examples include:
Related Guide: → How to Create an Email Account
Create FTP Accounts
FTP makes it easier to upload and manage website files.
Related Guide: → How to Create an FTP Account
Back Up Your Website
Create regular backups before making major changes to your website.
Related Guide: → How to Back Up Your Website
Add Additional Domains
If you manage multiple websites, you can add more domains through cPanel.
Related Guide: → How to Create an Addon Domain
Frequently Asked Questions
How Long Does It Take to Connect a Domain to HawkHost?
Most domains begin working within a few hours, although complete DNS propagation can take up to 48 hours.
Can I Connect a GoDaddy Domain to HawkHost?
Yes.
Simply replace your GoDaddy nameservers with the HawkHost nameservers or update your DNS records if you prefer to keep your existing nameservers.
Can I Use a Namecheap Domain?
Absolutely.
HawkHost works with domains registered at Namecheap and virtually every major domain registrar.
Do I Need to Change My Nameservers?
No.
Changing nameservers is the easiest method, but advanced users can instead update individual DNS records.
Why Isn’t My Website Loading?
The most common reasons include:
- DNS propagation is still in progress.
- Incorrect nameservers.
- Incorrect A Record.
- Browser cache.
- Hosting account not fully activated.
Can I Transfer My Domain to HawkHost Later?
Yes.
You can continue using your current registrar or transfer your domain to HawkHost in the future if you prefer managing everything in one place.
Final Thoughts
Connecting your domain to HawkHost is one of the most important steps after purchasing hosting. Without it, your website, email, and SSL certificate won’t function correctly.
For most users, updating your domain’s nameservers is the quickest and easiest method. It requires minimal technical knowledge and allows HawkHost to automatically manage your DNS settings.
More experienced users who rely on services like Cloudflare or custom DNS configurations may prefer updating individual DNS records instead.
Once your domain is connected, you’re ready to install WordPress, secure your website with SSL, create professional email accounts, and begin building your online presence.
Next Steps
Your domain is now connected—it’s time to launch your website.
Continue with these step-by-step tutorials:
- How to Install WordPress on HawkHost
- How to Access HawkHost cPanel
- How to Install Free SSL
- How to Create an Email Account
- How to Create an FTP Account
- How to Back Up Your Website
- HawkHost Pricing Explained
By following these guides, you’ll have everything you need to build, secure, and manage a professional website on HawkHost.
1 thought on “How to Connect a Domain to HawkHost (Step-by-Step Guide)”