Installing WordPress is one of the first technical steps you’ll need to complete when building a new website.
The good news is that installing WordPress is much easier than it used to be. Most modern hosting providers offer a one-click or automated WordPress installer, so you don’t necessarily need to upload files manually or create a database yourself.
However, simply clicking Install WordPress isn’t the whole process.
You also need to make sure your domain is connected correctly, HTTPS is working, WordPress is installed in the right directory, your administrator account is secure, and your website is properly configured after installation.
This WordPress installation guide walks you through the entire process from beginning to end.
The general process looks like this:
Domain
   ↓
Web Hosting
   ↓
DNS Configuration
   ↓
SSL / HTTPS
   ↓
WordPress Installation
   ↓
WordPress Dashboard
   ↓
Basic Configuration
   ↓
Website Ready
If you’re using HawkHost, you can also follow our dedicated guide:
How to Install WordPress on HawkHost
That article focuses specifically on the HawkHost + cPanel + Softaculous workflow, while this guide explains the broader WordPress installation process.
What Is WordPress?
WordPress is an open-source content management system (CMS) used to create and manage websites.
Instead of building every page from scratch with HTML, CSS, and PHP, WordPress gives you an administration dashboard where you can:
- Publish articles
- Create pages
- Upload images
- Manage menus
- Install themes
- Install plugins
- Create categories
- Manage users
- Configure website settings
For example, after installation your website may have:
https://example.comwhile the administration area is normally:
https://example.com/wp-adminYou use the front end to view the website and the WordPress dashboard to manage it.
What Do You Need Before Installing WordPress?
Before installing WordPress, there are several things you should have ready.
1. A Domain Name
A domain is your website’s address.
For example:
example.comYou can register a domain through your hosting provider or through a separate domain registrar.
If your domain is registered somewhere else, that’s completely fine. You simply need to connect it to your hosting account correctly.
For example:
Namecheap
    ↓
example.com
    ↓
DNS
    ↓
HawkHost
    ↓
WordPress
You can also like :
How to Connect a Domain to HawkHost
2. Web Hosting
WordPress needs a server where its files, database, images, and other website data can be stored.
This is what web hosting provides.
For a beginner website, you don’t necessarily need an expensive hosting plan.
A basic shared hosting plan can often be enough for a new WordPress website.
If you’re using HawkHost, see:
and:
3. SSL / HTTPS
Your website should use HTTPS rather than HTTP.
For example:
https://example.cominstead of:
http://example.comHTTPS protects the connection between the visitor’s browser and your website.
It is also important for user trust and modern website security.
If you’re using HawkHost, you can configure SSL after connecting your domain.
You can read more
How to Install Free SSL on HawkHost
4. Hosting Control Panel
Your hosting provider may give you access to a control panel such as cPanel.
With cPanel, you can manage things such as:
- Domains
- Files
- Databases
- SSL
- Backups
- Software
- WordPress installation
If your hosting account uses cPanel, you will usually install WordPress through an application installer such as Softaculous.
WordPress Installation Methods
There are two common ways to install WordPress.
Method 1: One-Click Installation
This is the easiest option for most beginners.
The process usually looks like:
Hosting Control Panel
       ↓
WordPress Installer
       ↓
Choose Domain
       ↓
Configure Installation
       ↓
Install
Depending on your hosting provider, the installer may be called:
- Softaculous
- WordPress Manager
- WordPress Toolkit
- One-Click WordPress Installer
This method is recommended for most beginners.
Method 2: Manual Installation
You can also install WordPress manually.
The general process is:
Download WordPress
       ↓
Upload Files
       ↓
Create Database
       ↓
Create Database User
       ↓
Configure wp-config.php
       ↓
Run WordPress Installer
Manual installation gives you more control, but it requires more technical knowledge.
For a normal website, there is usually no reason to choose manual installation if your hosting provider already provides an automated installer.
How to Install WordPress Using One-Click Installation
Let’s go through the installation process step by step.
Step 1: Log In to Your Hosting Account
First, log in to your hosting provider’s control panel.
If you’re using HawkHost, you can access cPanel from your HawkHost Client Area.
The workflow is generally:
HawkHost Client Area
        ↓
My Services
        ↓
Your Hosting Account
        ↓
Login to cPanel
You can read more :
How to Log in to HawkHost
How to Access HawkHost cPanel
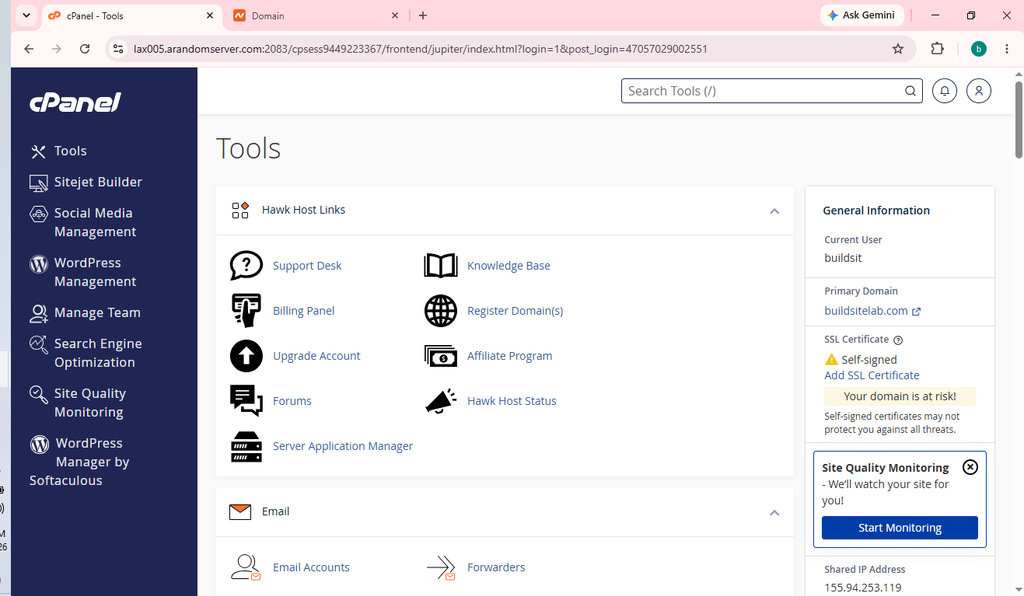
Step 2: Open the WordPress Installer
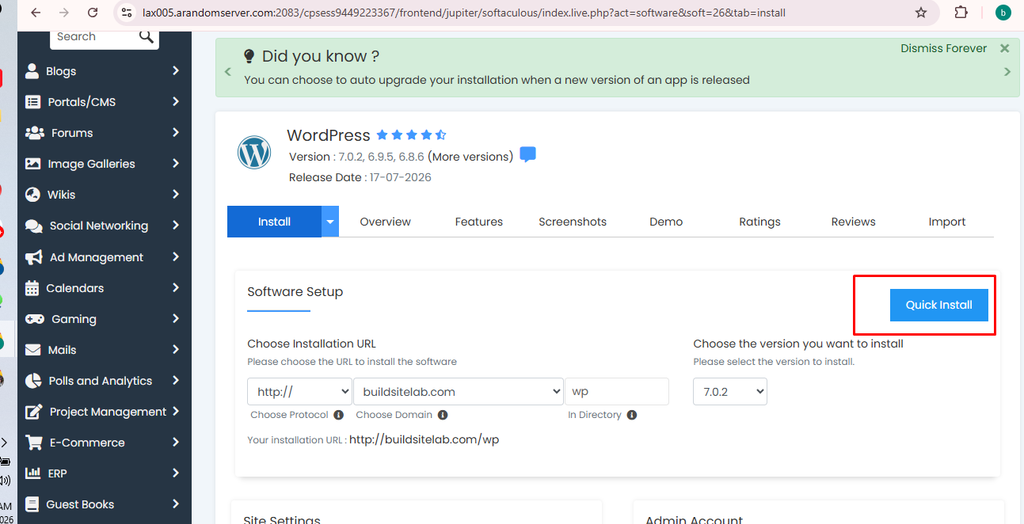
Inside your hosting control panel, find the WordPress installation tool.
If you’re using HawkHost with cPanel, look for:
Softaculous Apps Installer
You can usually search for:
SoftaculousThen open the application.
From there, select:
WordPress
and click:
Install
Step 3: Choose the Installation Domain
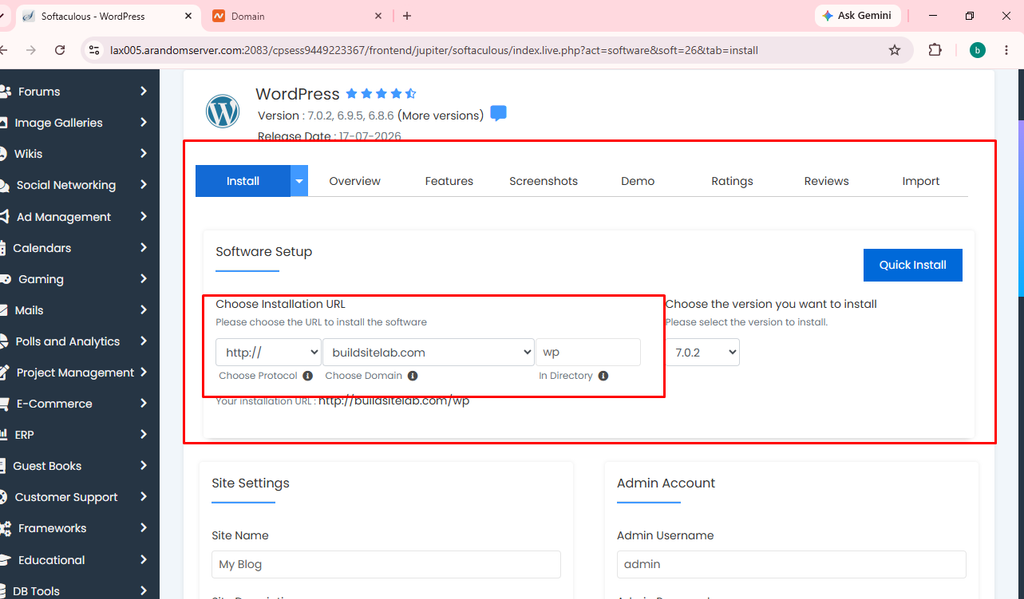
This is one of the most important steps.
Suppose you have:
example.comand:
secondsite.comChoose the domain where you want WordPress installed.
For example:
Domain:
example.com
Be careful if your hosting account contains several domains.
Installing WordPress on the wrong domain can create unnecessary work later.
Step 4: Choose HTTPS
If SSL is already active, choose:
https://Your installation URL should then look like:
https://example.comIf the installer provides several options, you may see:
http://
https://
http://www.
https://www.
For most new websites, use the HTTPS version that matches the canonical version you want for your website.
Step 5: Leave the Installation Directory Blank
This is an extremely common beginner mistake.
Suppose you want your website to be:
https://example.comYou normally want the installation directory to be empty.
Correct
Domain:
example.com

In Directory:
[blank]
This creates:
https://example.comDifferent result
If you enter:
wpWordPress may be installed at:
https://example.com/wpThat may be intentional for some websites, but it is not what most beginners want when installing WordPress for their main domain.
So if your goal is a normal WordPress website at the root domain, leave the directory field blank.
Step 6: Enter Your Website Name
The installer will usually ask for your website name.
For example:
Site Name:
BuildSiteLab
You may also see a field for:
Site Description
For example:
Site Description:
Hosting, WordPress, and website tutorials
Don’t worry if you change your mind later.
You can edit these settings from the WordPress dashboard.
Step 7: Create Your Administrator Account
Now create your WordPress administrator account.
You’ll usually need:
- Username
- Password
- Email address
For example:
Username:
your-username

Password:
Your strong password

Email:
you@example.com
Use a Strong Password
Don’t use:
123456
password
admin123
yourdomain123
Use a unique password that isn’t reused on other websites.
Your WordPress administrator account has significant control over your website, so protecting it is extremely important.
Step 8: Avoid an Obvious Admin Username
Avoid using:
admin
administrator
if your installer allows you to choose another username.
Use something less predictable instead.
For example:
site-manageror another unique username.
The username isn’t a replacement for a strong password, but avoiding obvious administrator usernames is still a sensible security practice.
Step 9: Select Your WordPress Language
You can usually select the language for your WordPress installation.
For example:
Englishor:
VietnameseThis mainly affects the WordPress administration interface and translated WordPress strings.
It doesn’t prevent you from publishing content in another language.
For example, you can use:
Dashboard:
English

Website Content:
English
or:
Dashboard:
Vietnamese

Website Content:
English
Step 10: Review Your Installation Settings
Before clicking Install, review everything.
A typical configuration might look like:
Protocol:
https://

Domain:
example.com

Directory:
[blank]
Site Name: BuildSiteLab Site Description: Hosting and website tutorials Admin Username: your-username Admin Password: ******** Admin Email: you@example.com
Pay particular attention to:
Domain
HTTPS
Installation directory
Administrator email
Administrator password
If these are correct, continue.
Step 11: Click Install
Click:
Install
The installer will create the WordPress installation.
Depending on the hosting provider and server, the process may take anywhere from a few seconds to several minutes.
Do not repeatedly click the installation button if the process appears to be running.
Wait until the installer confirms that the installation is complete.
Step 12: Confirm WordPress Installation
Once the installation is complete, you should receive a success message.
You may also be shown two important URLs:
Website URL
https://example.comWordPress Admin URL
https://example.com/wp-adminSave these URLs somewhere secure.

Step 13: Open Your Website
Now visit:
https://example.comYou should see your new WordPress website.
At this point, WordPress is technically installed, but your website isn’t necessarily finished.
Think of this as getting the basic engine running.
The next step is configuration.
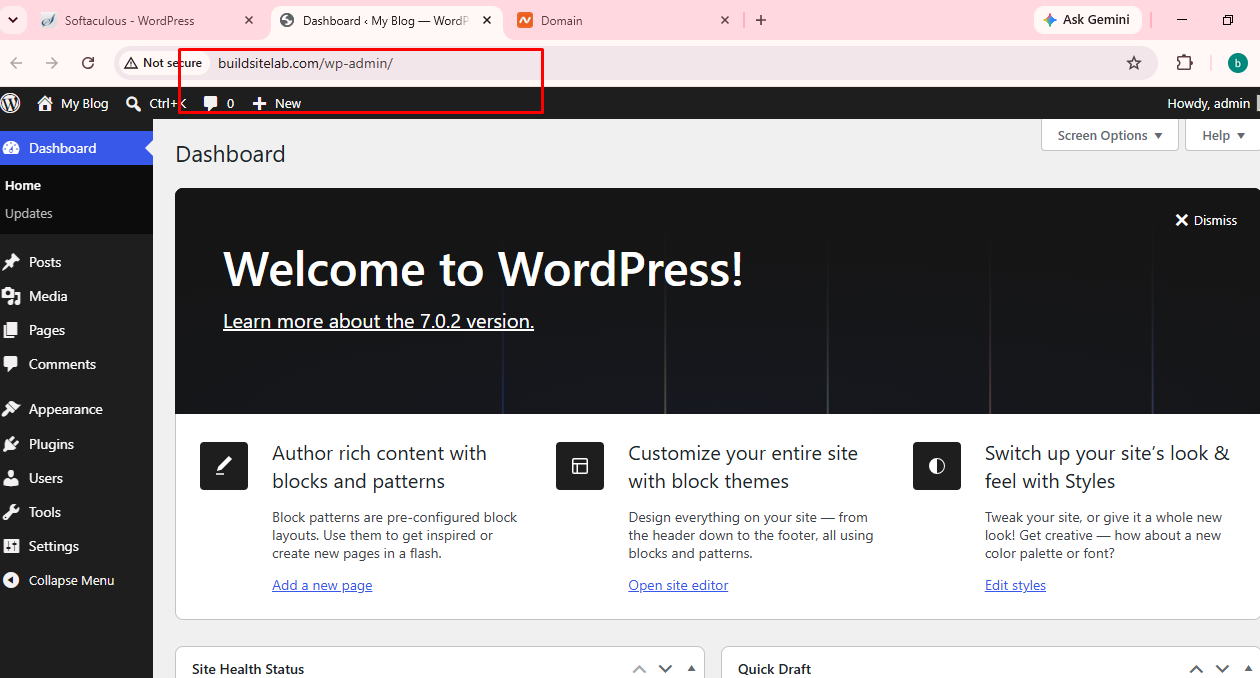
Step 14: Log In to WordPress
Go to:
https://example.com/wp-adminEnter the administrator credentials you created during installation.
After logging in, you’ll arrive at the WordPress Dashboard.
This is where you will manage your website.
What to Do Immediately After Installing WordPress
Don’t start publishing articles immediately.
There are several important settings you should check first.
1. Check Your Site URL
Go to:
Settings → General
Check:
WordPress Address (URL)
and:
Site Address (URL)
Make sure they use the correct domain and HTTPS version.
For example:
https://example.comBe careful when changing these fields.
An incorrect URL can prevent your website or WordPress dashboard from loading correctly.
2. Set Your Permalink Structure
Go to:
Settings → Permalinks
For many content-focused websites, a simple Post name structure is useful.
For example:
example.com/wordpress-installation-guide/instead of a URL containing unnecessary parameters or numbers.
This is particularly useful for blogs, informational websites, and affiliate websites.
3. Delete Unnecessary Default Content
A fresh WordPress installation may contain default content.
Review:
- Posts
- Pages
- Comments
Delete anything you don’t need.
Don’t leave unnecessary placeholder content on the public website.
4. Choose a WordPress Theme
Go to:
Appearance → Themes
Choose a theme that fits your website.
For a content website, prioritize:
- Fast loading
- Mobile responsiveness
- Clean typography
- Good navigation
- Accessibility
- Regular updates
- Compatibility with your plugins
Don’t install a large number of themes simply because they’re available.
5. Install Only the Plugins You Need
Plugins add functionality to WordPress.
For example, you might need plugins for:
- SEO
- Contact forms
- Caching
- Security
- Backups
- Image optimization
However, installing too many plugins can make your website harder to maintain.
A better approach is:
Need a feature?
      ↓
Find a suitable plugin
      ↓
Check quality + updates
      ↓
Install
      ↓
Configure
rather than:
Install 30 plugins
      ↓
Hope everything works
6. Configure SSL
Make sure your website works correctly over HTTPS.
Test:
https://example.comand verify that the browser doesn’t show an SSL warning.
If you are using HawkHost:
Internal link:
How to Install Free SSL on HawkHost
7. Configure Backups
Before you begin publishing a large amount of content, make sure your website has a reliable backup strategy.
You should know:
- What is being backed up
- Where backups are stored
- How often backups are created
- How to restore the website
A backup is especially important before major changes such as:
- Updating plugins
- Changing themes
- Editing important configuration
- Moving the website
- Performing major WordPress updates
8. Update WordPress
Check:
Dashboard → Updates
Update WordPress, themes, and plugins when appropriate.
Before major changes, having a recent backup is a good practice.
9. Create Your Essential Pages
Before publishing a lot of content, consider creating:
- Home
- About
- Contact
- Privacy Policy
- Terms and Conditions
- Affiliate Disclosure
The exact pages you’ll need depend on your website and business model.
For an affiliate website, an affiliate disclosure is particularly important.
10. Configure Your Navigation
Set up your main menu so visitors can easily find your content.
For a content website, you might organize your navigation around major topics.
For example:
Home
Hosting
WordPress
Domains
DNS
Guides
About
Contact
This also helps you build a logical internal linking structure.
WordPress Installation Using Manual Method
The automated installation method is normally the easiest option.
However, it’s useful to understand what manual WordPress installation involves.
Step 1: Download WordPress
Download the WordPress package from the official WordPress website.
You’ll receive the WordPress files in a compressed package.
Step 2: Upload WordPress Files
Upload the WordPress files to your hosting account.
You can use:
- File Manager
- FTP
- SFTP
For a main domain, the files need to be placed in the appropriate document root.
Step 3: Create a Database
WordPress requires a database to store:
- Posts
- Pages
- Users
- Settings
- Comments
- Plugin data
You need to create:
- Database
- Database user
- Database password
Then grant the appropriate permissions to the database user.
Step 4: Configure WordPress
During manual installation, WordPress needs database information such as:
Database Name
Database Username
Database Password
Database Host
WordPress uses this information to connect to the database.
Step 5: Run the Installation
Visit your domain.
WordPress will guide you through the installation process.
You’ll configure:
- Site title
- Administrator account
- Password
- Email address
Once completed, you can log in to:
https://example.com/wp-adminOne-Click vs Manual WordPress Installation
| Feature | One-Click Installation | Manual Installation |
|---|---|---|
| Difficulty | Easy | Advanced |
| Database setup | Automated | Manual |
| File upload | Automated | Required |
| Beginner friendly | ⭐⭐⭐⭐⭐ | ⭐⭐ |
| Control | Good | High |
| Recommended for beginners | Yes | Not usually |
For most new websites, the one-click method is the better choice.
Manual installation becomes more useful when you have a specific technical requirement or want to understand WordPress at a deeper level.
Common WordPress Installation Problems
WordPress Installed in the Wrong Folder
If you wanted:
example.combut WordPress appears at:
example.com/wpcheck the installation directory.
Domain Is Not Working
Check:
- Domain registration
- Nameservers
- DNS records
- Hosting account
- Domain configuration
If you recently changed nameservers, DNS propagation may also be involved.
How to Change Nameservers in HawkHost
HTTPS Is Not Working
Check whether SSL has been issued and configured for the domain.
If the certificate isn’t active yet, you may need to wait or troubleshoot the SSL configuration.
Can’t Access /wp-admin
Check:
https://yourdomain.com/wp-adminThen verify:
- Domain is working
- WordPress was installed correctly
- HTTPS is functioning
- You’re using the correct administrator credentials
If you forgot your password, use WordPress’s password reset functionality or your hosting tools.
White Screen or Error After Installation
If the website shows an error immediately after installation, possible causes can include:
- Plugin conflict
- Theme problem
- PHP compatibility issue
- Incomplete installation
- Hosting configuration issue
Start by checking the hosting control panel and WordPress installation.
Avoid changing many settings simultaneously because that makes troubleshooting harder.
How Long Does WordPress Installation Take?
The actual installation can be very quick when using a one-click installer.
However, the total process can take longer because you may also need to configure:
Domain
↓
DNS
↓
SSL
↓
WordPress
↓
Theme
↓
Plugins
↓
Pages
↓
Navigation
↓
Content
For a completely new website, think of WordPress installation as the beginning of the setup, not the end.
WordPress Installation Checklist
Before considering your installation complete, go through this checklist.
Hosting
- Hosting account active
- cPanel/control panel accessible
- Domain added correctly
Domain
- Domain registered
- DNS configured
- Domain points to hosting
WordPress
- WordPress installed
- Correct domain selected
- Installation directory checked
- Administrator account created
- Administrator email confirmed
Security
- HTTPS working
- Strong administrator password
- Unnecessary plugins removed
- Backup strategy configured
Website
- Theme selected
- Permalinks configured
- Site title configured
- Essential pages created
- Navigation configured
Frequently Asked Questions
Is WordPress free to install?
Yes. WordPress software itself is open-source.
However, you still need hosting and usually a domain to operate a publicly accessible website.
You may also choose to purchase premium themes, plugins, or other services.
Can I install WordPress without coding?
Yes.
Most hosting providers offer automated WordPress installation, so beginners don’t need to write code to perform the basic installation.
What is the easiest way to install WordPress?
For most beginners, the easiest method is the one-click installer provided by the hosting company.
On HawkHost, this can be done through cPanel and Softaculous.
For the HawkHost-specific process, see:
How to Install WordPress on HawkHost
Can I install WordPress on an addon domain?
Yes, as long as the hosting plan supports the domain and the addon domain has been configured correctly.
You can then install a separate WordPress website on that domain.
For example:
example.com
   ↓
Website A

secondsite.com
   ↓
Website B
Should WordPress be installed in the root directory?
For a main website, usually yes.
If your desired URL is:
https://example.comyou generally want WordPress installed in the domain’s document root rather than:
https://example.com/wpDo I need SSL before installing WordPress?
Not necessarily in every setup, but for a new website you should aim to have HTTPS configured as part of the initial setup.
If your installer allows you to select HTTPS and SSL is already available, use the HTTPS URL.
Conclusion
Installing WordPress doesn’t have to be complicated.
For most beginners, the easiest approach is to use the automated WordPress installer provided by their hosting company. The basic process is:
Buy Hosting
    ↓
Connect Domain
    ↓
Configure DNS
    ↓
Enable HTTPS
    ↓
Open Hosting Control Panel
    ↓
Open WordPress Installer
    ↓
Choose Domain
    ↓
Configure Installation
    ↓
Install WordPress
    ↓
Log in to /wp-admin
    ↓
Configure Website
The most important things to get right are your domain, HTTPS, installation directory, administrator credentials, and basic WordPress configuration.
If you’re using HawkHost, you can now move from this general guide to the dedicated tutorial:
How to Install WordPress on HawkHost
That article can walk you through the actual HawkHost cPanel and Softaculous interface using real screenshots from the hosting account.
2 thoughts on “WordPress Installation Guide: How to Install WordPress Step by Step”