Changing your domain’s nameservers is one of the first things you may need to do after purchasing HawkHost hosting. Nameservers tell the internet which DNS provider should manage your domain and, in a typical HawkHost setup, allow your domain to point to your HawkHost hosting account.
The process is relatively simple, but it can be confusing if this is your first time working with domains and DNS.
In this guide, you’ll learn how to find your HawkHost nameservers, change them for a domain registered with HawkHost, and update them when your domain is registered with another provider such as GoDaddy or Namecheap. I’ll also show you how to check whether the change has worked and what to do if your website is still not loading.
What Are Nameservers?
Before changing your nameservers, it helps to understand what they actually do.
A nameserver is part of the Domain Name System (DNS) that tells the internet where your domain’s DNS information is managed. In a typical hosting setup, your domain uses nameservers provided by your hosting company.
Think of the process like this:
Domain
   ↓
Nameservers
   ↓
DNS records
   ↓
Hosting server
   ↓
Your website
For example, when someone enters:
example.com
their device needs to determine which server should respond to that domain. DNS helps make that connection.
When you change your domain’s nameservers to the ones assigned to your HawkHost hosting account, you’re telling the domain to use HawkHost’s DNS infrastructure.
However, don’t assume that every HawkHost customer uses the same nameservers. HawkHost operates multiple DNS clusters, so the nameservers assigned to your account can vary. HawkHost recommends checking your New Account Information email or your Client Area to find the nameservers specifically assigned to your hosting account. (Hawk Host)
Before You Change Your Nameservers
Before making any changes, make sure you have the following:
- A working HawkHost hosting account
- A registered domain name
- Access to your domain registrar
- Your HawkHost nameservers
- Access to the email address associated with your hosting account
If you haven’t purchased hosting yet, you can start with:
And if you already have hosting but haven’t connected your domain, see:
How to Connect a Domain to HawkHost
Important: Find your exact HawkHost nameservers
Don’t copy nameservers from another HawkHost tutorial or another customer’s account.
HawkHost says that nameservers depend on the server/DNS cluster your account is assigned to. You can find yours in the New Account Information email or by opening your hosting service details under Client Area → My Services. (Hawk Host)
For example, your account might show something like:
ns1.example-hawkhost-nameserver.com
ns2.example-hawkhost-nameserver.com
Use the exact values shown in your own account.
Important: The example above is only a placeholder. Do not use example nameservers for your domain.
How to Find Your HawkHost Nameservers
There are two easy ways to find them.
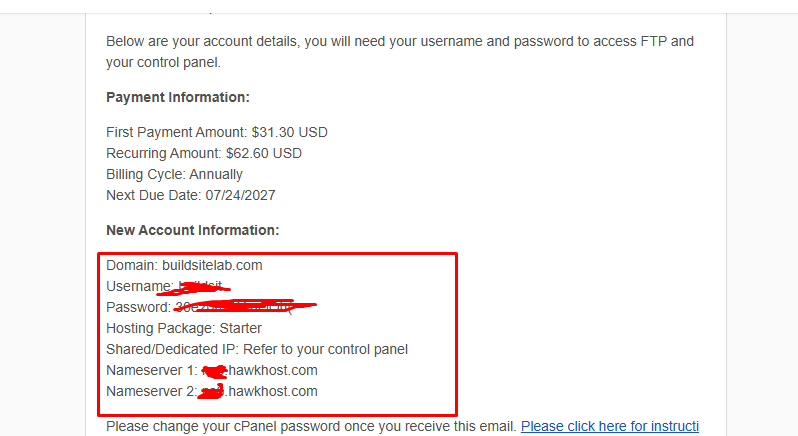
Method 1: Check Your HawkHost Welcome Email
After your hosting account is activated, HawkHost sends a New Account Information email.
Look for the section containing your hosting account details.
You should find your assigned nameservers there.
Method 2: Check Your HawkHost Client Area
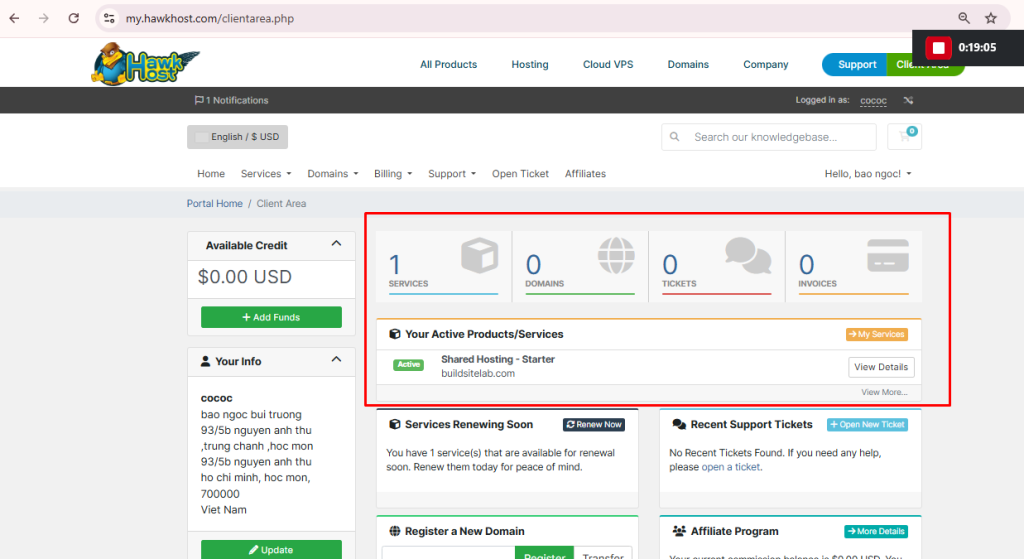
You can also find your nameservers through your HawkHost account.
- Log in to your HawkHost Client Area.
- Go to My Services.
- Select your hosting service.
- Open the service details.
- Look for the assigned nameservers.
HawkHost’s current documentation specifically recommends the Client Area as one of the places to find your assigned nameservers. (Hawk Host)
How to Change Nameservers for a Domain Registered at HawkHost
If your domain was registered directly through HawkHost, you can change the nameservers from the HawkHost Client Area.
HawkHost’s current instructions use the following process. (Hawk Host)
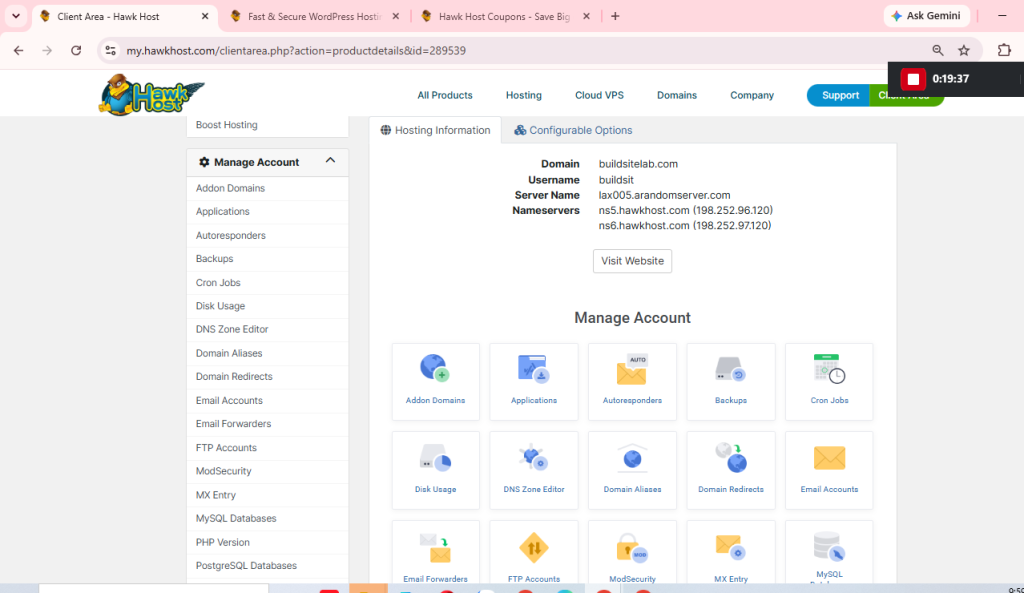
Step 1: Log in to HawkHost Client Area
Open your HawkHost Client Area and sign in.
Once you’re logged in, you’ll see your account dashboard.
Step 2: Go to Domains → My Domains
From the Client Area, open:
Domains → My Domains
You’ll see the domains associated with your account.
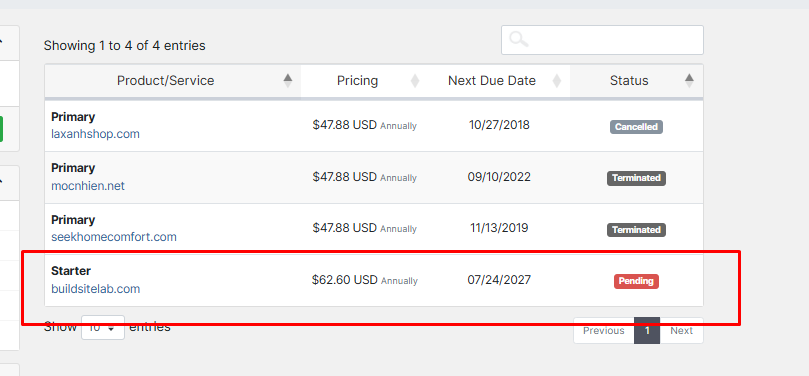
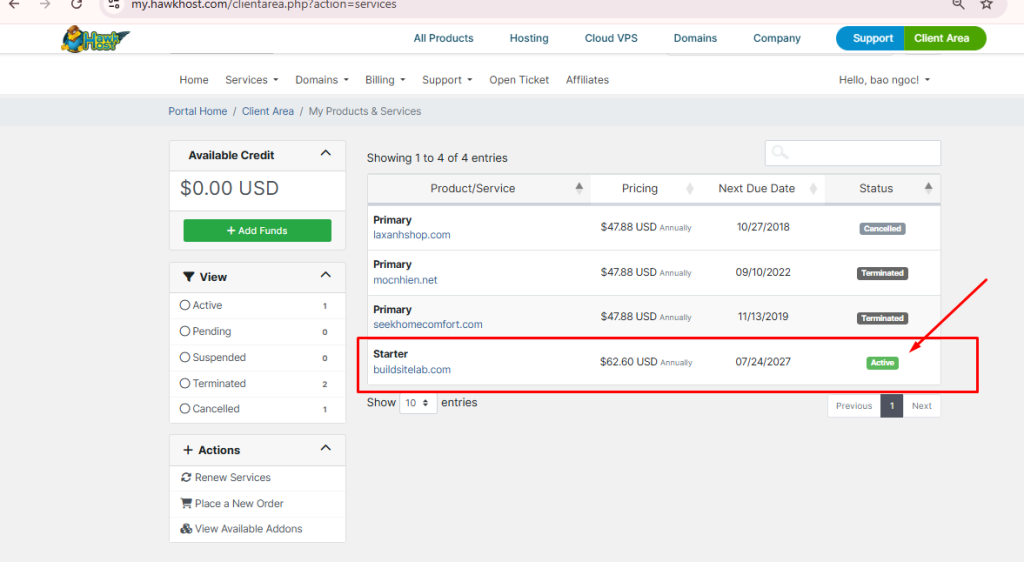
Step 3: Select Your Domain
Find the domain you want to configure.
Click the green Active button next to the domain.
This opens the domain management area. (Hawk Host)
Step 4: Open Nameservers
On the domain management page, look at the management menu on the left.
Select:
Nameservers
This will open the nameserver configuration page. (Hawk Host)
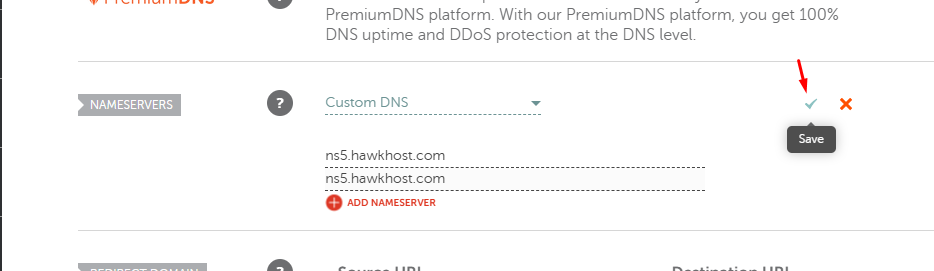
Step 5: Select Custom Nameservers
You’ll see an option to use custom nameservers.
Select:
Use custom nameservers (enter below)
You should then see fields where you can enter your nameservers.
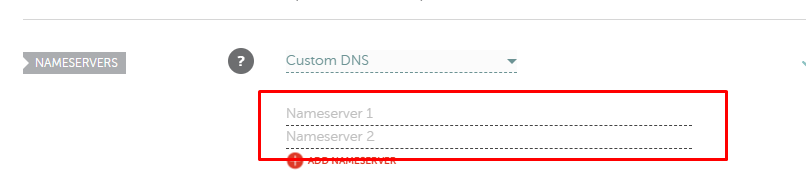
Step 6: Enter Your HawkHost Nameservers
Enter the nameservers assigned to your hosting account.
For example:
Nameserver 1: [Your HawkHost nameserver]
Nameserver 2: [Your HawkHost nameserver]
Again, don’t use nameservers copied from another website. Your account may have different nameservers because HawkHost operates multiple DNS clusters. (Hawk Host)
Step 7: Save the Changes
Click:
Change Nameservers
Your request will then be submitted.
According to HawkHost’s current documentation, the nameserver change is accepted by the registry immediately, but DNS propagation can take up to 24 hours. (Hawk Host)
How to Change HawkHost Nameservers at GoDaddy
Your domain does not have to be registered with HawkHost.
For example, you might buy:
- Hosting from HawkHost
- Domain from GoDaddy
In this situation, you normally keep the domain at GoDaddy and change its nameservers there.
The exact GoDaddy interface can change over time, but the general process is:
Step 1
Log in to your GoDaddy account.
Step 2
Open your domain list.
Step 3
Select the domain you want to configure.
Step 4
Find Nameservers.
Step 5
Choose the option to change or manage nameservers.
Step 6
Replace the existing nameservers with the nameservers assigned to your HawkHost account.
Step 7
Save the changes.
Tip: Don’t copy the exact button names from an old tutorial. Domain registrars frequently update their dashboards. Focus on finding the Nameservers section for your domain.
How to Change HawkHost Nameservers at Namecheap
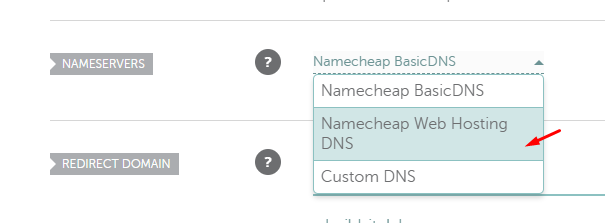
If your domain is registered with Namecheap, you can also connect it to HawkHost without transferring the domain.
This is the setup I use for my own domain.
You can keep:
Domain → Namecheap
Hosting → HawkHost
You don’t have to transfer the domain registration to HawkHost just to use HawkHost hosting.
Step 1
Log in to your Namecheap account.
Step 2
Open your domain list.
Step 3
Find the domain you want to connect.
Step 4
Open the domain’s DNS or nameserver settings.
Step 5
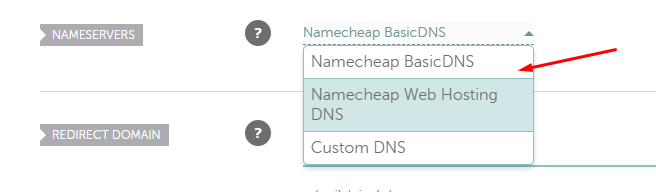
Select the option to use custom nameservers.
Step 6
Enter the nameservers assigned by HawkHost.
Step 7
Save the changes.
What If Your Domain Is Registered Somewhere Else?
The principle is the same.
You don’t necessarily need to transfer your domain to HawkHost.
You can usually:
Keep domain at registrar
          ↓
Change nameservers
          ↓
HawkHost nameservers
          ↓
HawkHost hosting
The exact menu names will depend on your registrar.
If your domain is registered with:
- Porkbun
- Cloudflare Registrar
- Squarespace Domains
- Name.com
- Dynadot
- Other registrars
look for Nameservers, DNS, or DNS Management in the domain settings.
The important part is that you enter the correct nameservers assigned to your HawkHost account.
How Long Does It Take for Nameserver Changes to Work?
This is one of the most common questions beginners have.
After you save the nameserver changes, your website may not immediately work everywhere.
HawkHost states that the nameserver change is accepted by the registry immediately, while DNS propagation can take up to 24 hours. (Hawk Host)
During this period, you may see different results depending on your location or internet connection.
For example:
Your computer → New server
Someone else → Old server
This doesn’t necessarily mean that something is broken.
DNS resolvers can continue using cached information until the relevant records expire. (Google Cloud Documentation)
Don’t keep changing the nameservers
If you entered the correct nameservers, give the change time to propagate.
Repeatedly changing the nameservers can make troubleshooting more confusing.
How to Check If Your Nameservers Changed Successfully
There are several ways to check.
Method 1: Check Your Domain’s WHOIS Information
You can perform a WHOIS lookup for your domain and check the nameservers listed there.
HawkHost specifically recommends using a WHOIS lookup to confirm the update. (Hawk Host)
Method 2: Check With a DNS Lookup Tool
You can use an online DNS lookup service and query your domain’s NS records.
You should eventually see the nameservers assigned to your HawkHost account.
Method 3: Visit Your Website
Try opening:
https://yourdomain.com
If your website loads from the HawkHost account, that’s another good indication that the connection is working.
However, don’t rely only on the website loading because browser and DNS caching can sometimes make the result misleading.
What to Do After Changing Your Nameservers
Once the nameserver change has propagated, your next steps are usually:
1. Check that the domain loads
Open your website in a browser.
2. Check HTTPS
Make sure your website loads using:
https://
rather than only:
http://
3. Access cPanel
Log in to your HawkHost cPanel.
4. Install WordPress
If you haven’t already installed WordPress, this is a good time to do it.
👉 Internal link: How to Install WordPress on HawkHost
5. Set up Google Search Console
Once your website is live, you can verify the website with Google Search Console and submit your XML sitemap.
Common Problems After Changing Nameservers
1. I Entered the Wrong Nameservers
This is one of the easiest mistakes to make.
Don’t use nameservers from a random HawkHost tutorial.
Your assigned nameservers can differ from another HawkHost customer because HawkHost uses multiple DNS clusters. (Hawk Host)
Solution: Check your New Account Information email or Client Area.
2. My Website Still Shows the Old Hosting
If you’ve just changed the nameservers, DNS propagation may not have finished.
Wait and check again later.
If the problem continues after propagation, verify that the nameservers are correct.
3. My Website Is Down After Changing Nameservers
First, check that you entered the correct nameservers.
Then:
- Check your domain.
- Check your HawkHost account.
- Clear your local DNS/browser cache.
- Try another network.
- Check the DNS records.
HawkHost also recommends testing from another connection and verifying DNS when troubleshooting a site that appears to be down.
4. My SSL Certificate Is Showing a Warning
If the domain has just been pointed to a new hosting account, SSL may need to be issued or configured on the new server.
First make sure the domain is correctly pointing to HawkHost.
Then check your SSL configuration in cPanel.
Don’t assume that changing nameservers itself is an SSL configuration step.
5. My Email Stopped Working
This is an important issue to consider before changing nameservers.
Nameservers determine which DNS records are being used. If your email currently relies on MX records at your old DNS provider, switching nameservers without recreating the necessary DNS records can interrupt email delivery.
Before changing nameservers on a domain that already has email, make sure you understand where its email DNS records are managed.
Should You Transfer Your Domain to HawkHost?
No, not necessarily.
There are two separate things:
Domain registration
and
Web hosting
You can keep your domain registered at Namecheap, for example, while hosting the website at HawkHost.
Namecheap
   │
   └── Domain registration
           │
           ↓
      Nameservers
           │
           ↓
       HawkHost
           │
           ↓
        Website
This is a perfectly normal setup.
HawkHost also offers domain registration and transfers, but using HawkHost hosting does not require you to move your domain registration there.
Frequently Asked Questions
How many nameservers should I use for HawkHost?
Use the nameservers provided for your specific HawkHost account. Don’t assume that another HawkHost customer’s nameservers are the same as yours because HawkHost operates multiple DNS clusters. (Hawk Host)
Where can I find my HawkHost nameservers?
Check the New Account Information email you received when your hosting was activated, or go to Client Area → My Services and open your hosting service details. (Hawk Host)
Can I keep my domain at Namecheap?
Yes. You can keep your domain registered at Namecheap and point it to HawkHost by changing the domain’s nameservers.
Do I need to transfer my domain to HawkHost?
No. A domain transfer is not required just to use HawkHost hosting.
How long does DNS propagation take?
HawkHost currently says nameserver changes are accepted by the registry immediately, while DNS propagation can take up to 24 hours. (Hawk Host)
Do I need to reinstall WordPress after changing nameservers?
No. Changing nameservers doesn’t mean you need to reinstall WordPress. The purpose is to direct DNS traffic to the appropriate hosting/DNS infrastructure.
Can I use Cloudflare instead of HawkHost nameservers?
Yes, but that’s a different DNS setup. If you use Cloudflare nameservers, you’ll manage the relevant DNS records through Cloudflare rather than relying on HawkHost’s nameservers. Make sure the required DNS records point to the correct HawkHost server.
Can I change my nameservers back later?
Yes. You can change them again through your domain registrar. However, avoid unnecessary changes because every nameserver change can require additional DNS propagation time.
Conclusion
Changing your nameservers is usually a straightforward process once you understand where your domain is registered and which nameservers your HawkHost account uses.
The basic process is:
1. Find your HawkHost nameservers
             ↓
2. Log in to your domain registrar
             ↓
3. Open Nameserver settings
             ↓
4. Replace the existing nameservers
             ↓
5. Save the changes
             ↓
6. Wait for DNS propagation
             ↓
7. Check that your website works
The most important thing is to use the nameservers assigned to your own HawkHost account, rather than copying values from another tutorial. HawkHost confirms that these can vary depending on the DNS cluster your account is assigned to. (Hawk Host)
Once your domain is pointing correctly to HawkHost, the next step is to install WordPress and start configuring your website.
👉 Next: How to Install WordPress on HawkHost
1 thought on “How to Change Nameservers in HawkHost (Step-by-Step Guide)”