If you have just purchased HawkHost hosting and connected your domain, the next step is usually to install WordPress.
The good news is that you don’t need to manually download WordPress files, create a MySQL database, upload files through FTP, or configure everything from scratch. HawkHost provides Softaculous through cPanel, which can be used to install WordPress with a few steps. HawkHost’s current documentation says the installation normally takes only a few minutes.
The basic process looks like this:
HawkHost ->Client Area ->cPanel -> Softaculous ->WordPress ->Choose Domain ->Configure WordPress ->Install ->WordPress Website
In this guide, I’ll show you exactly how to install WordPress on HawkHost, what settings to choose during installation, what to do if you want WordPress installed directly on your main domain, and what you should configure immediately after installation.
Important: The exact appearance of cPanel and Softaculous can change over time. The steps below follow HawkHost’s current documentation, but your interface may look slightly different.
What Is WordPress?
WordPress is a content management system (CMS) that allows you to create and manage a website without having to build every page manually with code.
You can use WordPress to create:
- Blogs
- Business websites
- Affiliate websites
- Portfolio websites
- News websites
- Online stores
- Membership websites
- Documentation sites
For a website such as BuildSiteLab, WordPress can provide the foundation for publishing articles, organizing categories, adding images, managing SEO, and installing plugins.
HawkHost specifically provides WordPress-oriented hosting options and supports one-click WordPress installation through cPanel.
What You Need Before Installing WordPress
Before starting the installation, make sure you have completed the basic hosting setup.
1. A HawkHost Hosting Account
You need an active hosting account.
If you haven’t purchased hosting yet, see:
2. A Domain Name
You also need a domain where WordPress will be installed.
For example:
example.com
Your domain can be registered with HawkHost or another registrar.
If your domain is registered somewhere else, make sure it is correctly connected to your HawkHost hosting.
See:
How to Connect a Domain to HawkHost
3. Access to cPanel
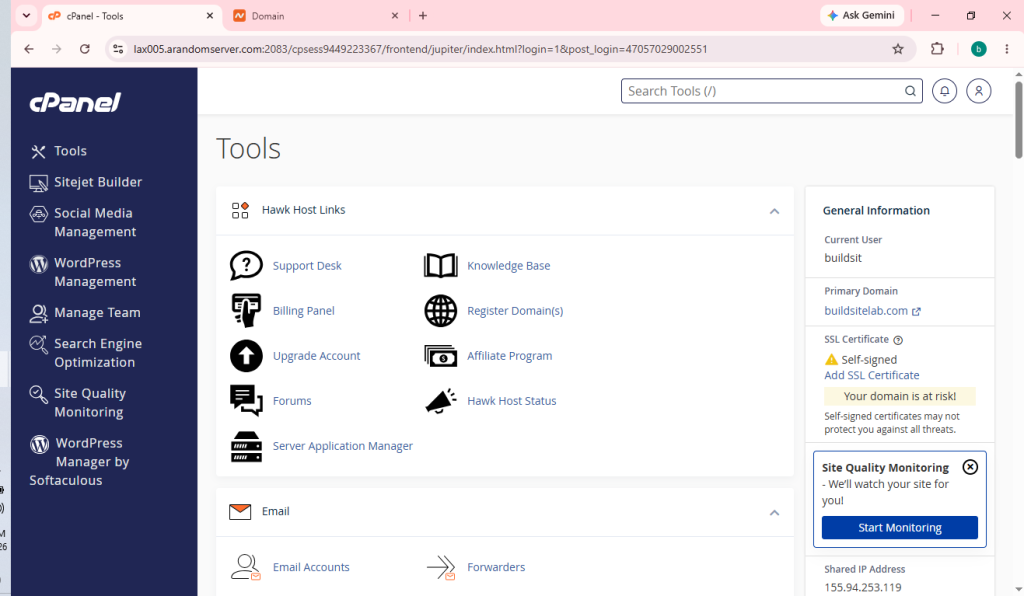
You need access to your HawkHost cPanel.
If you are a beginner, the easiest way is usually to access cPanel through the HawkHost Client Area.
HawkHost currently provides several cPanel login methods, including through the Client Area, through your domain when DNS is pointed to HawkHost, or through the server hostname provided in your account information.
See:
and:
Before You Install WordPress: Check Your Domain
This step is easy to overlook.
Suppose you want WordPress to be installed at:
https://example.com
Make sure example.com is the domain you actually want to use.
If you have multiple domains in your HawkHost account, you might see something like:
example.comexample.netblog.example.comsecondsite.com
Choose carefully.
Installing WordPress on the wrong domain can create unnecessary cleanup work later.
Step 1: Log in to HawkHost Client Area
Start by logging in to your HawkHost account.
From the Client Area, go to your hosting service and access cPanel.
The general workflow is:
HawkHost Client Area -> My Services -> Active Hosting -> cPanel
HawkHost’s current cPanel documentation explains that you can use the One Click Login option from the hosting service details page to enter cPanel without manually entering the cPanel username and password.
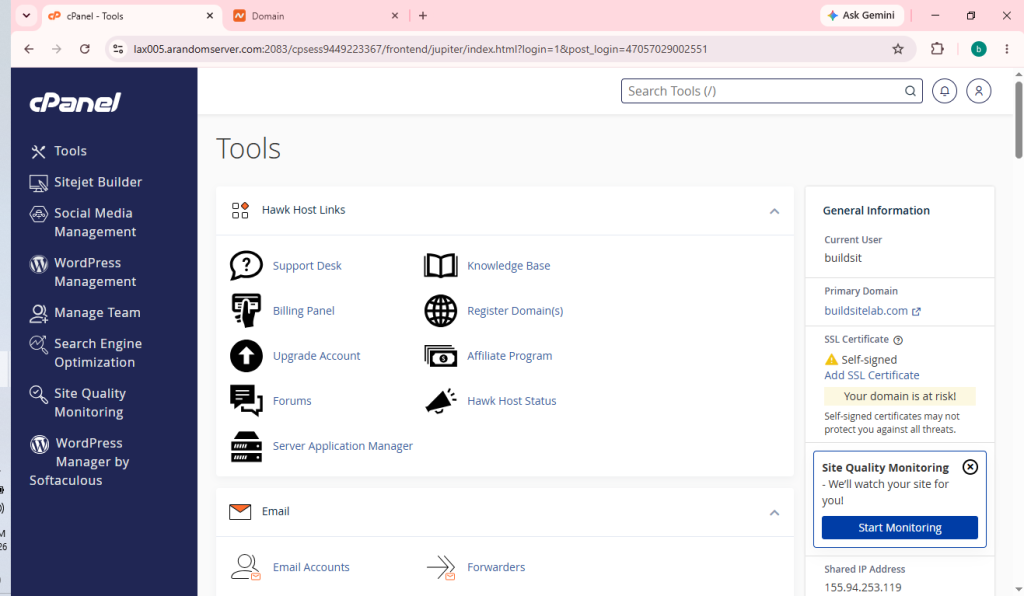
Step 2: Open cPanel
Once you enter cPanel, you will see the main cPanel dashboard.
This is where you can manage your hosting account.
Depending on your HawkHost account, you may see tools for:
- Files
- Domains
- Databases
- Security
- Software
- Metrics
- WordPress
- Backup
For this tutorial, we are interested in the software installation section.
Step 3: Find Softaculous Apps Installer
In cPanel, look for:
Softaculous Apps Installer
You can also use the cPanel search bar and type:
Softaculous
HawkHost’s current documentation specifically recommends searching for Softaculous in cPanel or finding it under the Software section.
The process is:
cPanel ->Search ->Softaculous ->Softaculous Apps Installer
Step 4: Open WordPress in Softaculous
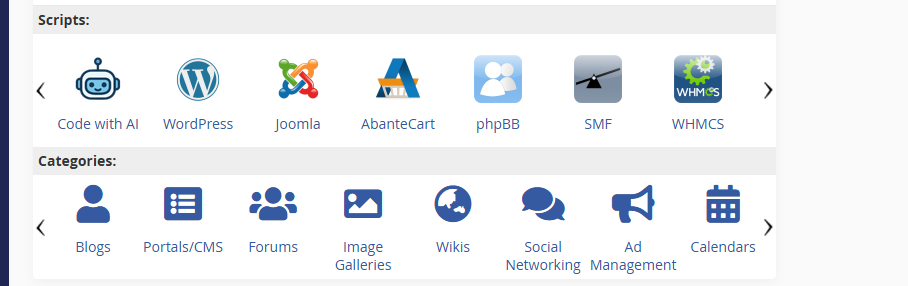
After opening Softaculous, you’ll see the Softaculous interface.
WordPress should be available directly on the dashboard, or you can search for it.
Search for:
WordPress
Then select WordPress.
HawkHost’s documentation currently describes WordPress as being available directly from the Softaculous dashboard.
Step 5: Click Install
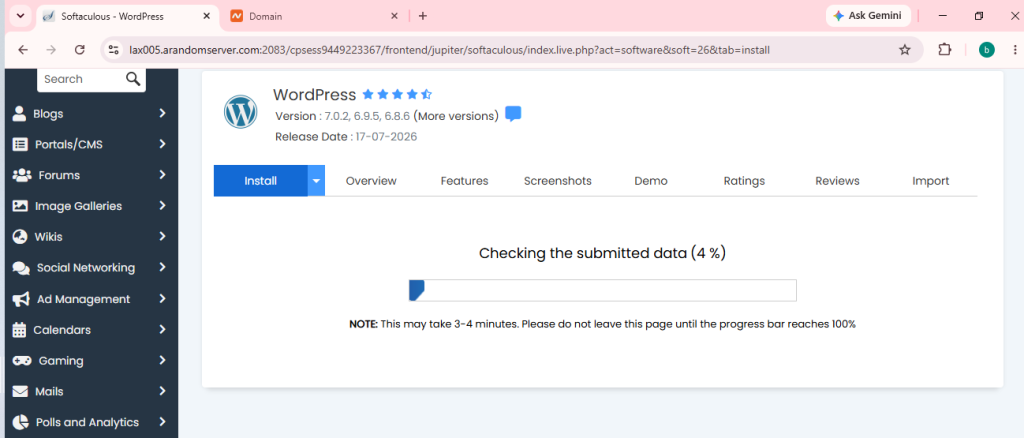
After selecting WordPress, you’ll see information about the application and an option to install it.
Click:
Install
You will then be taken to the WordPress installation configuration page.
This is the most important part of the process because you need to choose the correct domain and installation location.
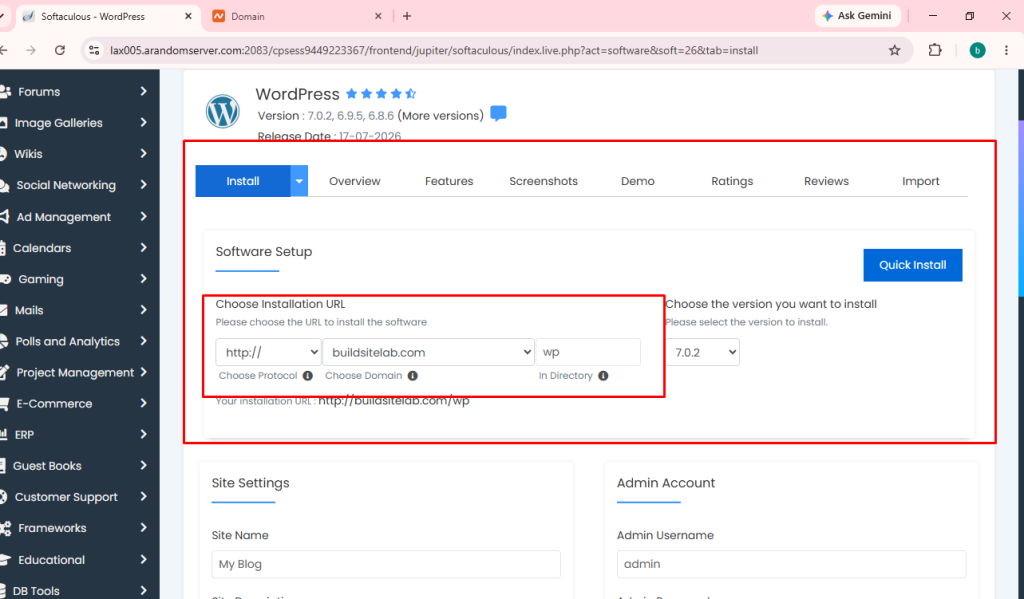
Step 6: Choose the WordPress Installation URL
Softaculous will ask where you want WordPress installed.
You’ll typically see options such as:
Protocol
Domain
In Directory
For example:
Protocol:https://Domain:example.comIn Directory:
Choose HTTPS
If SSL is already active on your domain, use:
https://
instead of:
http://
For example:
https://example.com
HawkHost’s current WordPress installation guide specifically recommends setting the protocol to https:// for a secure installation.
If SSL isn’t working yet, you may need to complete your SSL setup before proceeding.
See:
How to Install Free SSL on HawkHost
Step 7: Choose Your Domain
Select the domain where you want WordPress installed.
For example:
example.com
If you have an addon domain, you may also be able to choose that domain.
For example:
example.comsecondsite.com
Choose the correct domain carefully.
Step 8: Leave “In Directory” Blank for the Main Website
This is one of the most important settings in the entire installation process.
Suppose your domain is:
example.com
and you want your WordPress website to load at:
https://example.com
Then the In Directory field should normally be left empty.
HawkHost specifically warns that Softaculous may otherwise install WordPress into a /wp directory by default. If you want WordPress directly on the domain, leave the directory field blank.
Correct
Domain:example.comIn Directory:[blank]
Result:
https://example.com
Not what you usually want for a main site
Domain:example.comIn Directory:wp
Result:
https://example.com/wp
For most beginners building their main website, you probably want:
https://example.com
not:
https://example.com/wp
Step 9: Configure Your Site Name
Softaculous will ask for basic website information.
You may see fields such as:
Site Name
Site Description
For example:
Site Name:BuildSiteLabSite Description:Hosting and website tutorials for beginners
Don’t worry if you haven’t finalized these yet.
Most of these settings can be changed later from the WordPress dashboard.
Step 10: Create Your WordPress Admin Account
This is another important step.
You will need to create your WordPress administrator credentials.
Typically you’ll configure:
- Admin username
- Admin password
- Admin email
For example:
Username:your-admin-namePassword:[strong unique password]Email:you@example.com
HawkHost recommends using a strong, unique password for the WordPress administrator account.
Don’t Use “admin” as Your Username
Avoid using an obvious administrator username such as:
adminadministrator
Instead, use a unique username.
For example:
siteadmin2026
or another username that isn’t publicly obvious.
More importantly, use a strong, unique password and protect the email account associated with the administrator account.
Step 11: Choose Your WordPress Language
Softaculous also allows you to select the language for your WordPress installation.
For example:
English
or:
Vietnamese
Choose whichever language you want to use for your WordPress administration interface.
This setting doesn’t prevent you from publishing content in another language.
For example, you can have:
WordPress Dashboard: English Website Content: English
or:
WordPress Dashboard: Vietnamese Website Content: English
Step 12: Review the Installation Settings
Before installing WordPress, stop for a moment and check everything.
Your configuration might look like:
Protocol:https://Domain:example.comIn
Directory:[blank]
Site Name: Your WebsiteSite
Description: Your Description Admin
 Username:your-usernameAdmin
 Password:********Admin
Email:you@example.com
Language:English
The most important things to check are:
1. Correct domain
Make sure you’re installing WordPress on the intended domain.
2. Correct protocol
Use:
https://
when SSL is ready.
3. Empty directory for the main domain
If you want:
example.com
rather than:
example.com/wp
leave In Directory blank.
Step 13: Click Install
Once everything is correct, scroll down and click:
Install
Softaculous will begin installing WordPress.
You don’t need to manually upload WordPress files.
You don’t normally need to manually create the WordPress database either.
Softaculous handles the installation process for you.
HawkHost says the installation generally takes around two to three minutes.
Step 14: Wait for WordPress to Finish Installing
You’ll see an installation progress screen.
Wait until the process finishes.
Don’t close the browser while the installation is still running.
When successful, Softaculous should display a confirmation similar to:
Congratulations, the software was installed successfully.
HawkHost’s documentation confirms that this is the expected success message after installation.
Step 15: Open Your New WordPress Website
After installation, open your domain:
https://example.com
You should now see your new WordPress website.
Instead of the default HawkHost page, you should see the WordPress site.
The structure is:
HawkHost ->cPanel ->Softaculous->WordPress->Installation Complete ->https://example.com
Step 16: Log in to WordPress Admin
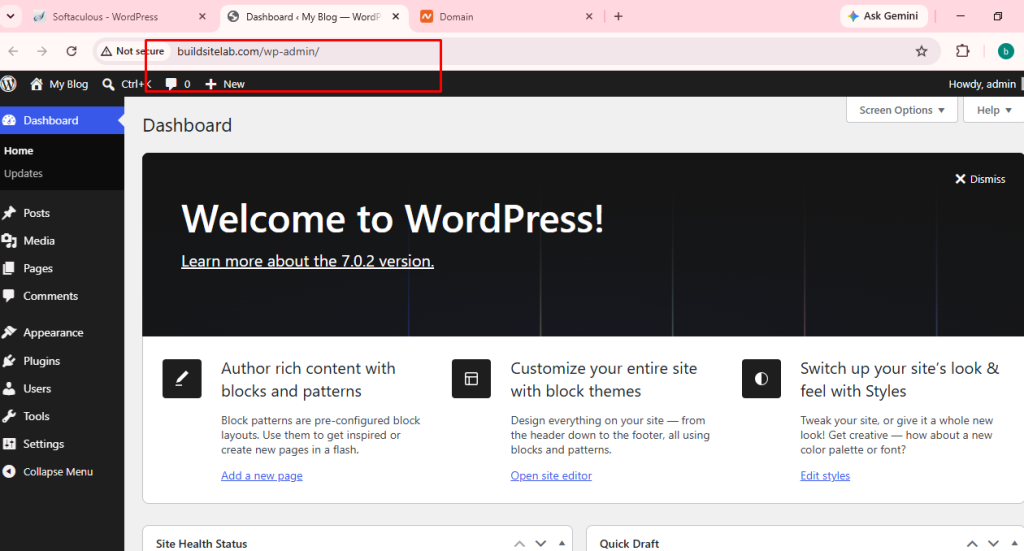
Your WordPress administration area is normally available at:
https://example.com/wp-admin
Replace example.com with your actual domain.
For example:
https://yourdomain.com/wp-admin
Enter the WordPress administrator username and password you created during installation.
You should then see the WordPress dashboard.
WordPress->wp-admin ->Dashboard
What to Do After Installing WordPress
Installing WordPress is only the beginning.
Your website is now online, but there are several things you should configure before publishing content.
1. Check Your SSL
Open:
https://yourdomain.com
Make sure the website loads securely.
You should see the HTTPS connection in your browser.
If you see an SSL warning, don’t ignore it.
Check your SSL configuration before continuing.
Internal link:
How to Install Free SSL on HawkHost
2. Check WordPress Site Address
Go to:
Settings → General
Check:
WordPress Address (URL)
and:
Site Address (URL)
For a standard installation, they should normally use the correct HTTPS version of your domain.
For example:
https://example.com
Don’t change these values randomly after your site is live because incorrect URL settings can make your website inaccessible.
3. Change Your Permalink Structure
Go to:
Settings → Permalinks
For an article-based website, a simple structure is often:
Post name
This produces URLs such as:
example.com/how-to-install-wordpress/
rather than a less descriptive URL.
For your BuildSiteLab content strategy, this is particularly useful because you are building a large collection of informational and how-to articles.
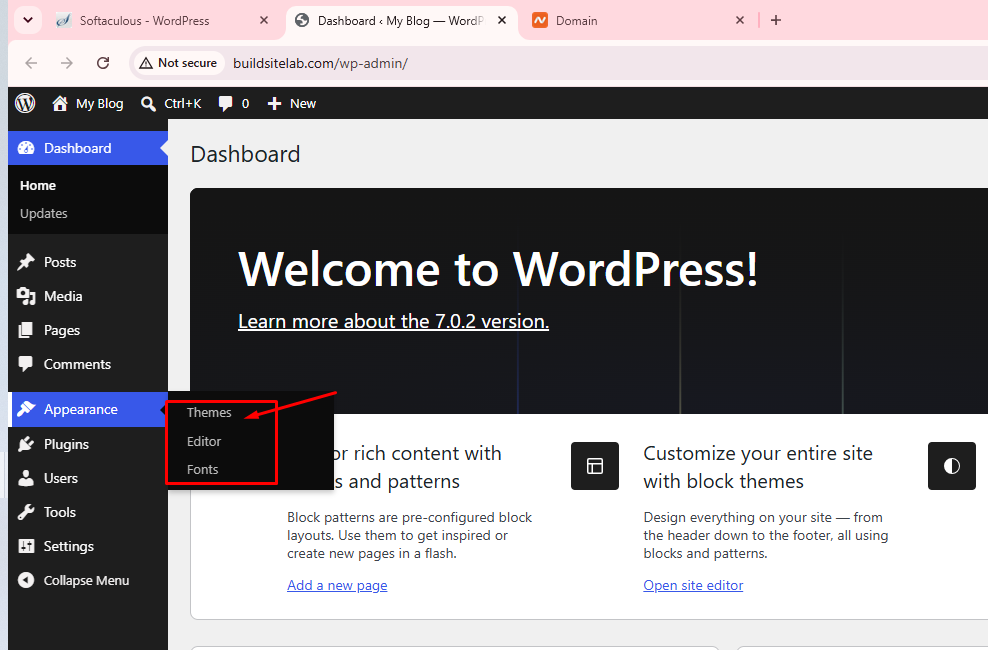
4. Install Your Theme
Go to:
Appearance → Themes
Then choose a theme appropriate for your website.
You don’t need to install dozens of themes.
Start with one lightweight theme and customize it.
5. Install Essential Plugins
Don’t install every plugin you find.
Start with only the tools your website actually needs.
Depending on your site, you may need plugins for:
- SEO
- Caching
- Security
- Contact forms
- Backups
- Image optimization
Keep your plugin collection under control.
Every additional plugin can introduce another maintenance requirement.
6. Configure Backups
Before publishing a lot of content, make sure you understand how your website will be backed up.
You should know:
- Where backups are stored
- How to restore a backup
- How often backups run
- Whether your hosting account includes backup functionality
This becomes particularly important once your website starts receiving traffic.
Internal link:
How to Backup Your Website on HawkHost
7. Update WordPress
After installation, check whether WordPress itself needs updates.
Also check:
- Themes
- Plugins
Keeping WordPress components updated is an important part of website maintenance.
8. Create Your First Page
You can now create basic pages such as:
- Home
- About
- Contact
- Privacy Policy
- Terms of Service
Then begin publishing your main content.
For an affiliate website, make sure important disclosure and legal pages are also handled appropriately.
Common Problems When Installing WordPress on HawkHost
WordPress Was Installed at /wp
This is one of the easiest mistakes to make.
If you visit:
example.com
and WordPress is actually at:
example.com/wp
check the In Directory field you used during installation.
HawkHost specifically notes that Softaculous can use /wp by default and that leaving the directory field empty installs WordPress in the domain’s home directory.
WordPress Isn’t Loading on the Domain
If the domain doesn’t show your new WordPress installation, check:
DNS
Is your domain pointing to HawkHost?
Domain
Did you install WordPress on the correct domain?
Directory
Did you accidentally install WordPress in /wp or another folder?
SSL
Is HTTPS configured correctly?
cPanel
Does the domain exist correctly in your hosting account?
Softaculous Isn’t Showing WordPress
First, make sure you’re actually inside the correct cPanel account.
Then search for:
Softaculous
HawkHost’s current documentation says Softaculous can be accessed through cPanel and WordPress can be found through the Softaculous interface.
If the option is unavailable, check your hosting account or contact HawkHost support.
PHP Version Problem
HawkHost’s current documentation notes that WordPress requires PHP 7.4 or higher and says the PHP version can be changed from the Select PHP Version section in cPanel.
If you encounter a PHP-related installation or compatibility problem, check:
cPanel ↓Select PHP Version
However, don’t change PHP versions randomly on an existing production website. Check compatibility first.
Should You Install WordPress Manually?
For most beginners, no.
You can technically install WordPress manually by:
- Downloading WordPress
- Uploading files
- Creating a database
- Creating a database user
- Configuring
wp-config.php - Running the WordPress installer
But if Softaculous is available, there is usually little reason for a beginner to go through all those steps.
HawkHost specifically provides WordPress installation through Softaculous, making the one-click method much simpler.
A manual installation can still be useful as an advanced tutorial later.
How Long Does WordPress Installation Take?
The actual installation is usually very quick.
HawkHost currently states that the installation should take around two to three minutes, although the actual time can vary.
The complete setup for a beginner will take longer because you also need to:
- Connect the domain
- Configure SSL
- Choose a theme
- Configure WordPress
- Install necessary plugins
- Create pages
So don’t confuse WordPress installation time with complete website setup time.
Frequently Asked Questions
Can I install WordPress on HawkHost?
Yes. HawkHost supports WordPress installation through Softaculous in cPanel.
Is WordPress free to install on HawkHost?
WordPress itself is open-source software. HawkHost provides one-click installation through Softaculous as part of the hosting environment.
You may still have separate costs for hosting, domain registration, premium themes, plugins, or other services.
Can I install WordPress without knowing how to code?
Yes.
Using Softaculous, you don’t need programming knowledge to perform the basic WordPress installation.
You simply select your domain, configure the installation, create your administrator account, and start the installation.
Where do I log in to WordPress after installation?
The standard WordPress administration URL is:
https://yourdomain.com/wp-admin
Replace yourdomain.com with your actual domain.
Should I install WordPress in /wp?
If you want your main website to be:
https://example.com
you generally should leave the In Directory field blank during installation.
If you enter:
wp
WordPress will instead be installed under:
https://example.com/wp
HawkHost explicitly documents this distinction.
Can I install WordPress on an addon domain?
Yes, provided the addon domain has been correctly added to the hosting account and is available as an installation domain in Softaculous.
This is useful when you want:
example.com ->Website Asecondsite.com ->Website B
See:
How to Create an Addon Domain in HawkHost
Can I install multiple WordPress websites on HawkHost?
The ability to host multiple WordPress installations depends on the hosting plan and its resource/domain limits.
HawkHost’s current WordPress hosting information lists support for multiple domains on its displayed Starter plan, including unlimited domains, but always check the current plan details before making a purchase decision.
What happens if I install WordPress twice?
Be careful.
If you install WordPress twice into the same location, you can create conflicts or overwrite an existing installation.
Before installing WordPress, always check:
Domain+Directory
Make sure the destination is exactly where you want the installation.
Recommended Order for Setting Up Your HawkHost Website
If you’re following the BuildSiteLab HawkHost cluster, I recommend this order:
How to Buy HawkHost Hosting
How to Log in to HawkHost
How to Access HawkHost cPanel
How to Connect a Domain to HawkHost
How to Install WordPress on HawkHost
How to Install Free SSL
Configure WordPress
Choose a Theme
Install Essential Plugins
Publish Your First Article
This creates a logical journey for a beginner.
Someone who arrives at the WordPress installation article can move backward to learn about hosting and domain setup, or forward to the next technical step.
Conclusion
Installing WordPress on HawkHost is relatively straightforward when you use the Softaculous installer available through cPanel.
The complete process is:
HawkHost Client Area -> cPanel ->Softaculous ->WordPress -> Choose Your Domain -> Leave "In Directory" Blank ->Configure Admin Account ->Install ->WordPress Website
The most important setting to pay attention to is the installation directory. If you want WordPress to load directly at https://yourdomain.com, leave the In Directory field empty rather than entering wp. HawkHost’s own documentation specifically highlights this point.
Once WordPress is installed, don’t immediately start publishing articles. First make sure your HTTPS, WordPress settings, theme, plugins, backups, and basic website pages are properly configured.
Next: Learn How to Install Free SSL on HawkHost and secure your new WordPress website.
1 thought on “How to Install WordPress on HawkHost: A Complete Step-by-Step Guide”