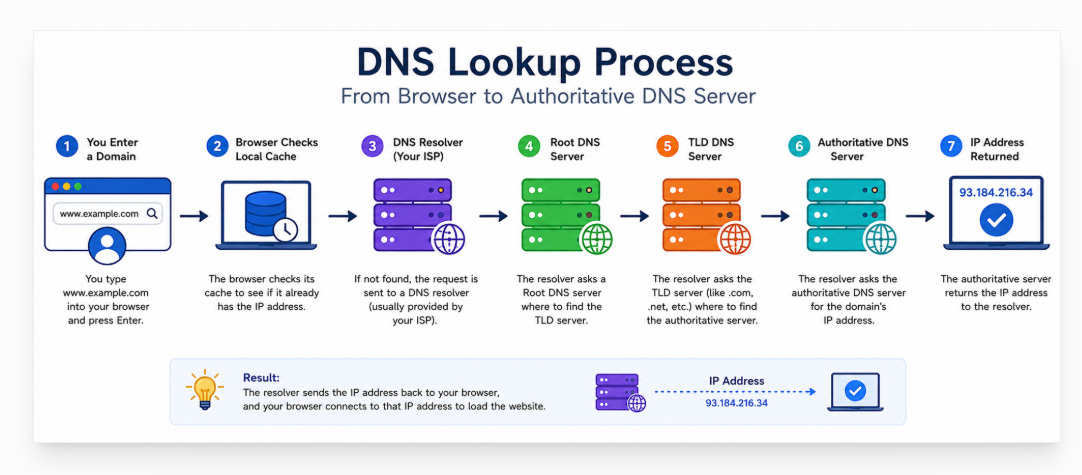
When you type example.com into your browser, your computer does not automatically know which server hosts that website. Before the browser can load the website, it needs to find the server’s IP address.
This is where DNS comes in.
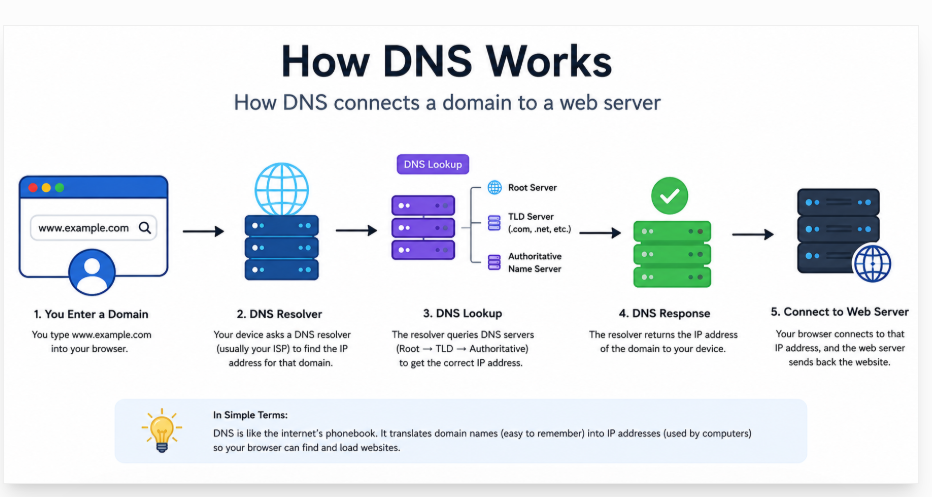
DNS, or Domain Name System, works behind the scenes to connect human-readable domain names with the information computers need to locate websites and other online services.
A simplified version looks like this:
example.com
↓
DNS
↓
IP Address
↓
Web Server
↓
Website
You do not normally need to understand every technical detail of DNS to run a website. However, understanding the basics can make it much easier to connect a domain to hosting, change nameservers, configure DNS records, troubleshoot websites, and manage services such as email.
In this beginner-friendly guide, we will explain how DNS works, what DNS servers and resolvers do, how nameservers and DNS records are related, what DNS propagation means, and how DNS connects a domain to a HawkHost hosting account.
What Is DNS?
DNS stands for Domain Name System.
In simple terms, DNS translates human-readable domain names into information that computers can use to locate websites and other online services.
For example, people can easily remember:
example.comBut a computer needs an IP address to establish a connection with the appropriate server.
A simplified example is:
example.com
      ↓
     DNS
      ↓
93.xxx.xxx.xxx
DNS acts like a lookup system between the domain name and the destination server.
When you enter a domain into your browser, DNS helps determine where that domain should connect.
DNS can help connect a domain to:
- A web server
- An email server
- Another hostname
- Verification services
- Other online services
This is why DNS is an essential part of how the internet works.
Why Do We Need DNS?
Without DNS, users would have to remember IP addresses instead of domain names.
For example, instead of typing:
https://example.comyou might need to enter something similar to:
https://93.xxx.xxx.xxxThat would be much harder to remember, especially when you regularly visit many websites.
DNS provides several important benefits.
1. Easier-to-Remember Domain Names
People can remember names such as:
example.commuch more easily than numerical IP addresses.
2. You Can Change Servers Without Changing the Domain
Suppose your website currently uses one hosting provider and later moves to another server.
You can update the relevant DNS configuration while keeping the same domain name.
Visitors can continue using:
example.comeven though the underlying server has changed.
3. DNS Supports Multiple Services
DNS is not only used for websites.
A domain can have different DNS records for different services, including:
- Websites
- Verification
- Subdomains
- Other online services
For example, an A record can point a domain toward a web server, while MX records can specify mail servers.
4. DNS Connects Domains to Hosting
When you purchase a domain from one company and hosting from another, DNS is one of the systems that connects the two.
For example:
Domain Registrar
↓
DNS / Nameservers
↓
Hosting Server
↓
Website
This is particularly important when setting up a domain with HawkHost.
Related guide: How to Connect a Domain to HawkHost
How Does DNS Work?
This is the most important part to understand.
When you enter a domain such as:
https://example.comyour browser needs to determine where the domain is hosted.
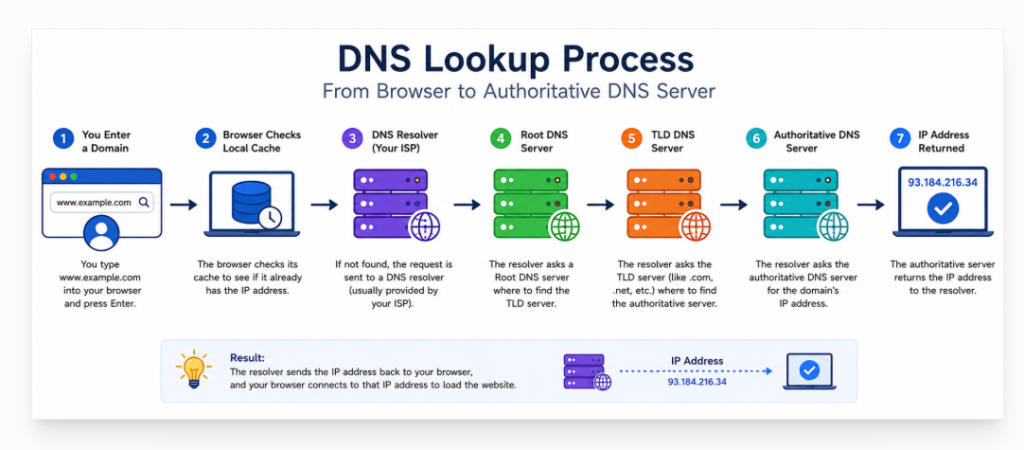
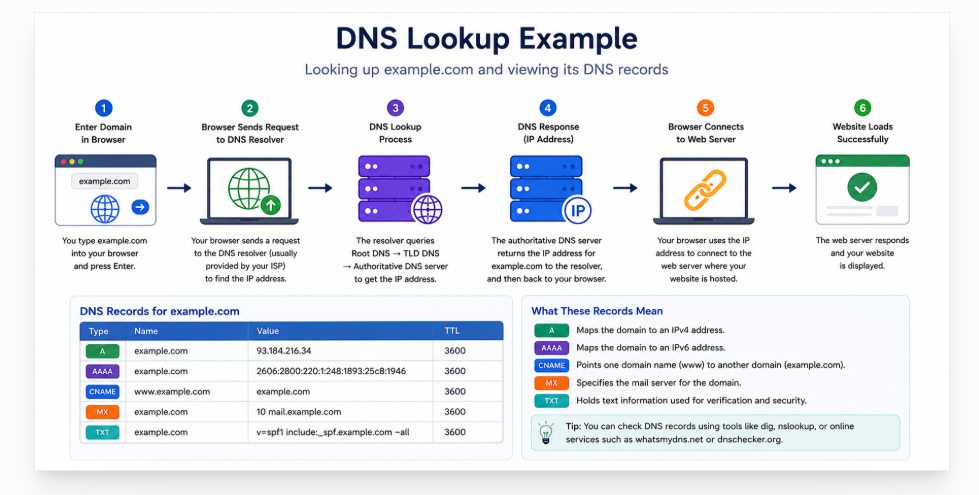
A simplified DNS lookup process looks like this:
1. User enters a domain
↓
2. Browser checks its cache
↓
3. DNS Resolver
↓
4. Root DNS Server
↓
5. TLD DNS Server
↓
6. Authoritative DNS Server
↓
7. DNS record returns the required information
↓
8. Browser connects to the web server
↓
9. Website loads

The complete process can involve several systems working together.
Let’s look at each step.
Step 1 — You Enter a Domain Name
Imagine that you enter:
https://example.cominto your browser.
The browser needs to determine where example.com should connect.
In simple terms, it needs to answer:
Which server should I connect to?
This starts the DNS lookup process.
The browser does not simply ask one server for an IP address and immediately receive the answer in every situation. It may first check cached information before requesting DNS information from a resolver.
Step 2 — Your Browser Checks Its Cache
Before starting a complete DNS lookup, your device may already have DNS information stored in a cache.
Caching can occur at different levels, including:
- Browser
- Operating system
- Local network
- DNS resolver
If the required DNS information is already cached and has not expired, the browser or operating system may be able to use that information without performing the complete lookup again.
This caching is one reason DNS can work efficiently.
It also explains why DNS changes may not appear immediately for every user.
Step 3 — The DNS Resolver
If the required information is not available in the local cache, the request can be sent to a DNS resolver.
A DNS resolver is responsible for finding the DNS information needed to answer the request.
Your DNS resolver may be provided by:
- Your internet service provider
- A public DNS provider
- Your organization or network administrator
A simplified flow looks like this:
Your Device
↓
DNS Resolver
The resolver then performs the necessary DNS queries to find the answer.
You can think of the resolver as the system that does the DNS lookup on behalf of your device.
Step 4 — The Root DNS Server
If the resolver does not already have the required information cached, it can begin the DNS lookup process by querying the DNS hierarchy.
The first important level is the root DNS system.
The root does not normally provide the final IP address for example.com.
Instead, it helps direct the resolver toward the appropriate Top-Level Domain (TLD) DNS infrastructure.
The simplified process is:
DNS Resolver
↓
Root
↓
TLD
↓
Authoritative DNS
This hierarchical structure allows DNS to organize and manage a huge number of domain names.
Step 5 — The TLD DNS Server
TLD stands for Top-Level Domain.
It refers to the final part of a domain name.
For example:
example.com
       ↑
      .com
Another example:
example.org
       ↑
      .org
There are many different TLDs, including common extensions such as:
.com.org.net.info
The TLD DNS infrastructure helps the resolver identify the authoritative nameservers responsible for the specific domain.
The simplified flow is:
Resolver
↓
Root
↓
.com TLD
↓
Authoritative DNS for example.com
Step 6 — The Authoritative DNS Server
The authoritative DNS server is one of the most important parts of the process.
It contains the authoritative DNS information for a domain.
For example:
example.com
↓
Authoritative DNS
↓
DNS Records
↓
IP Address
DNS records can contain different types of information.
Common DNS record types include:
- A
- AAAA
- CNAME
- MX
- TXT
- NS
For a website, an A record can be used to associate a hostname with an IPv4 address.
For example:
example.com
     ↓
A Record
     ↓
93.xxx.xxx.xxx
The authoritative DNS server provides the information that the resolver needs.
Related guide: What Is a DNS Record?
If you are building a complete DNS content cluster, DNS Records Explained would also be a useful supporting article.
Step 7 — DNS Returns the IP Address
Once the resolver finds the required DNS record, it can return the information to your device.
For example:
example.com
     ↓
93.xxx.xxx.xxx
The browser now knows which IP address it should connect to.
The DNS part of the process has helped translate the domain name into the information required to locate the server.
Step 8 — The Browser Connects to the Web Server
After receiving the necessary IP address, the browser can establish a connection to the web server.
The simplified process is:
Browser
↓
IP Address
↓
Web Server
↓
Website
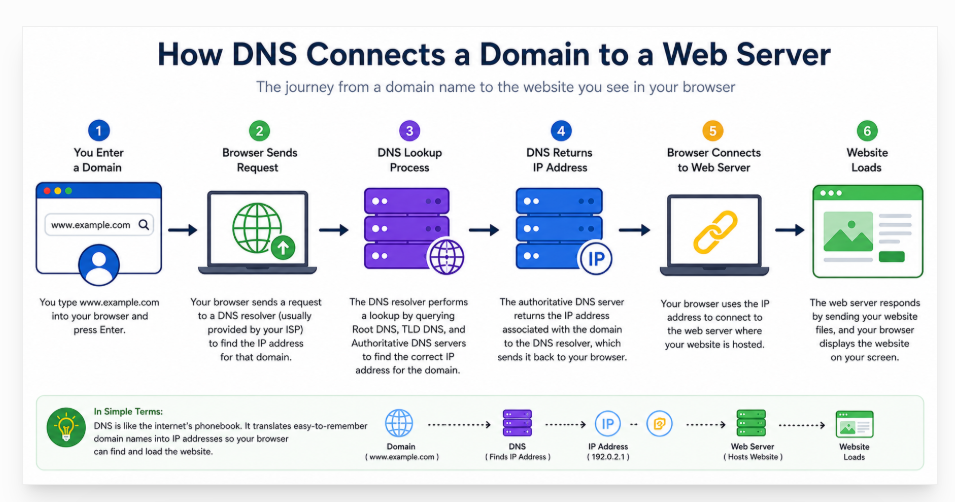
If the website uses HTTPS, the browser also establishes a secure TLS connection as part of loading the website.
Finally, the server sends the requested website resources back to the browser.
What Are DNS Nameservers?
Nameservers are another concept that often confuses beginners.
Nameservers tell the internet which DNS servers are authoritative for a domain.
For example:
example.com
↓
Nameservers
↓
DNS Provider
↓
DNS Records
The nameservers identify where the DNS information for the domain is managed.
This is different from the actual website IP address.
For example, when you change the nameservers for your domain to those provided by your hosting company, you are essentially telling the DNS system where the authoritative DNS information for your domain is managed.
Simplified example
Domain Registrar
↓
HawkHost Nameservers
↓
HawkHost DNS
↓
A Record
↓
HawkHost Server
↓
Website
Related guide: How to Change Nameservers in HawkHost
What Are DNS Records?
DNS records are individual pieces of DNS information stored within a domain’s DNS configuration.
Different record types are used for different purposes.
A Record
An A record associates a hostname with an IPv4 address.
For example:
example.com
     ↓
A
     ↓
93.xxx.xxx.xxx
This is commonly used to point a website hostname to a web server.
AAAA Record
An AAAA record is used to associate a hostname with an IPv6 address.
The main difference is the IP address format being used.
- A → IPv4
- AAAA → IPv6
CNAME Record
A CNAME record points one hostname to another hostname.
For example:
www.example.com
       ↓
example.com
CNAME records are commonly used when one hostname should follow another hostname’s DNS configuration.
MX Record
An MX record specifies the mail servers responsible for receiving email for a domain.
For example:
example.com
     ↓
MX
     ↓
Mail Server
If you change your DNS configuration and accidentally remove or modify the required MX records, email delivery can be affected.
TXT Record
TXT records can be used for several purposes.
Common examples include:
- Domain verification
- SPF-related information
- DKIM-related information
- Other service verification
For this reason, you should be careful when editing TXT records.
DNS vs. Nameservers: What’s the Difference?
DNS and nameservers are related, but they are not exactly the same thing.
DNS
DNS is the Domain Name System.
It is the overall system used to translate domain names into DNS information and direct requests toward the appropriate services.
Nameservers
Nameservers are DNS servers that provide authoritative DNS information for a domain.
A simplified structure looks like this:
Domain
↓
Nameservers
↓
DNS Zone
↓
DNS Records
↓
IP / Email / Other Services
Think of nameservers as telling the internet where to ask for the DNS information, while DNS records contain the actual information being requested.
How DNS Connects a Domain to Hosting
This is particularly important if your domain and hosting are purchased from different providers.
For example, suppose you purchase:
Domain: Namecheap
Hosting: HawkHost
The general setup can look like this:
Namecheap Domain
↓
HawkHost Nameservers
↓
HawkHost DNS
↓
A Record
↓
HawkHost Server
↓
Website
In this setup, the domain remains registered with Namecheap while DNS can be managed through the nameserver configuration associated with HawkHost.
Another simplified version is:
Domain Registrar
↓
HawkHost Nameservers
↓
HawkHost DNS
↓
Hosting Account
↓
Website
The exact configuration depends on how you choose to manage DNS.
Typical Setup Process
For a new HawkHost website, the process may look like:
- Purchase a domain.
- Purchase a HawkHost hosting plan.
- Obtain the appropriate HawkHost nameserver information.
- Update the nameservers at your domain registrar when required.
- Allow DNS changes to propagate.
- Confirm that the domain resolves to the correct hosting environment.
- Install WordPress or another website application.
Related guides:
How to Connect a Domain to HawkHost
How to Change Nameservers in HawkHost
How to Install WordPress on HawkHost
What Is DNS Propagation?
When you change DNS information, the new configuration does not necessarily become visible to every user at exactly the same moment.
This is commonly referred to as DNS propagation.
A simplified example is:
Old DNS Information
↓
DNS Change
↓
New DNS Information
↓
Caching / TTL
↓
Different networks update over time
DNS information can be cached by resolvers and other systems.
As a result, one network may see the new DNS information while another network may temporarily still have older cached information.
This is why you may sometimes see different DNS results from different locations after changing nameservers or DNS records.
Don’t Always Say “DNS Takes 24–48 Hours”
A common statement is:
DNS always takes 24–48 hours.
That is too absolute.
A better explanation is:
DNS changes can become visible quickly, but caching and TTL settings can cause different networks to see the old or new information for some time.
The actual timing depends on the DNS configuration, caching, TTL values, and other factors.
What Is TTL in DNS?
TTL stands for Time to Live.
In DNS, TTL determines how long DNS information can generally be cached before it needs to be refreshed.
For example:
TTL = 3600 secondsThis is approximately:
1 hourLower TTL
A lower TTL can allow DNS information to be refreshed sooner after a change, although it can also result in more DNS queries.
Higher TTL
A higher TTL allows information to remain cached for longer.
This can improve caching efficiency, but changes may take longer to become visible after an update.
For beginners, the easiest way to remember TTL is:
TTL helps determine how long DNS information can be cached.
What Happens When DNS Is Not Configured Correctly?
Incorrect DNS settings can cause different website and email problems.
DNS_PROBE_FINISHED_NXDOMAIN
This type of browser error can indicate that the requested domain could not be resolved.
Possible causes include:
- Incorrect DNS configuration
- Missing DNS records
- Domain configuration problems
- Nameserver issues
The Website Shows the Old Server
Suppose you moved your website to a new hosting server but visitors still reach the old server.
Possible causes include:
- The DNS record still points to the old server
- Cached DNS information
- Nameserver configuration has not been updated correctly
- The new DNS configuration is not the one being used
The Website Does Not Load
Incorrect DNS configuration can prevent a domain from reaching the intended server.
Check:
- A record
- AAAA record
- Nameservers
- DNS configuration
- Hosting configuration
Email Stops Working
DNS also controls important email-related information.
If the required MX records are deleted or changed incorrectly, email delivery can be affected.
This is why you should always be careful when editing DNS records on a domain that is already being used for email.
How to Check Your DNS
If you are troubleshooting a domain, checking the DNS configuration is a good place to start.
Method 1: Check Nameservers
First, check which nameservers are currently associated with your domain.
For example:
example.com
     ↓
Nameservers
     ↓
DNS Provider
This tells you which DNS system is authoritative for the domain.
Method 2: Check DNS Records
Next, check the relevant DNS records.
Common records include:
- A
- AAAA
- CNAME
- MX
- TXT
- NS
For a website, start by checking the relevant A or AAAA records.
For email problems, check the MX records.
For verification problems, check the relevant TXT or CNAME records.
Method 3: Use DNS Lookup Tools
You can also use DNS lookup and DNS checker tools to inspect DNS results.
These tools can help you see:
- Current DNS records
- Nameservers
- IP addresses
- MX records
- DNS responses from different locations
DNS Example for a New HawkHost Website
Let’s put everything together with a simple example.
Suppose you have:
Domain: example.com
Registrar: Namecheap
Hosting: HawkHost
You want example.com to load your WordPress website hosted on HawkHost.
A simplified flow could be:
Namecheap
↓
Domain
↓
HawkHost Nameservers
↓
HawkHost DNS
↓
DNS Records
↓
HawkHost Server
↓
WordPress Website
The general process is:
1. Purchase the Domain
Register your domain with your preferred domain registrar.
2. Purchase Hosting
Purchase a suitable hosting plan from HawkHost.
3. Get the HawkHost Nameservers
Find the appropriate nameserver information for your hosting account.
4. Update Nameservers
At your domain registrar, replace the existing nameservers with the appropriate HawkHost nameservers when using that setup.
5. Wait for DNS Changes
DNS caches may mean that different networks do not see the new configuration at exactly the same time.
6. Check the Domain
Once the DNS configuration is active, visit:
https://example.comand verify that the domain reaches your HawkHost website.
7. Install WordPress
Once the domain and hosting are correctly connected, you can proceed with your WordPress installation.
Related guides:
How to Buy HawkHost Hosting
How to Connect a Domain to HawkHost
How to Change Nameservers in HawkHost
How to Install WordPress on HawkHost
DNS vs. Domain Registrar vs. Hosting
Beginners often confuse these three things.
They perform different roles.
Domain Registrar
The registrar is where you register and manage your domain name.
For example:
example.comDNS Provider
The DNS provider manages the authoritative DNS configuration for the domain.
It can manage records such as:
- A
- AAAA
- CNAME
- MX
- TXT
Hosting Provider
The hosting provider supplies the server or hosting environment where your website runs.
For example:
Website Files
WordPress
Database
Server
A single company can provide more than one of these services, but they are still different functions.
A useful mental model is:
Registrar
→ manages the domain registration
DNS
→ tells the internet where services are located
Hosting
→ provides the environment where the website runs
Frequently Asked Questions
What is DNS in simple terms?
DNS is the system that helps translate human-readable domain names into information computers use to locate websites and other online services.
How does DNS work?
When you enter a domain, your device checks available cached information and, when necessary, uses a DNS resolver to find the authoritative DNS information for that domain. The resolver can query the DNS hierarchy and return the required DNS information, such as an IP address.
What is a DNS server?
A DNS server is a server that handles DNS queries or provides DNS information. Different DNS servers can perform different roles, including recursive resolution and authoritative DNS hosting.
What is a DNS resolver?
A DNS resolver receives DNS requests and looks up the information needed to answer them. It may use cached information or query other DNS servers.
What are nameservers?
Nameservers are the authoritative DNS servers associated with a domain. They tell the DNS system where the authoritative DNS information for that domain can be found.
What is the difference between DNS and nameservers?
DNS is the overall Domain Name System, while nameservers are DNS servers that provide authoritative information for domains.
How long does DNS propagation take?
There is no single fixed propagation time for every DNS change. Caching and TTL settings can affect when different networks see updated DNS information.
What happens if DNS is wrong?
Incorrect DNS settings can cause websites not to load, domains to resolve to the wrong server, email delivery problems, or other DNS-related errors.
Can I change DNS without changing nameservers?
Yes. If the current nameservers already point to the DNS provider you want to use, you can generally modify the DNS records without changing the nameservers themselves.
Conclusion
DNS may seem complicated when you first encounter terms such as DNS resolver, root server, TLD, authoritative nameserver, A record, CNAME, MX, and TTL. However, the basic concept is straightforward.
DNS helps connect a human-readable domain name with the information required to reach an online service.
The simplified process is:
Domain
↓
DNS Resolver
↓
Root
↓
TLD
↓
Authoritative DNS
↓
DNS Record
↓
IP Address
↓
Web Server
↓
Website
Understanding this process makes it much easier to troubleshoot domains and configure hosting.
When setting up a new HawkHost website, you will especially want to understand the relationship between your domain registrar, nameservers, DNS records, and hosting server.
Once you understand those four pieces, tasks such as connecting a domain, changing nameservers, configuring DNS records, and troubleshooting DNS problems become much easier.