
If you already have a website running on HawkHost and want to host another website on the same hosting account, you may not need to purchase a second hosting plan.
An addon domain allows you to add another domain to an existing hosting account and use it for a separate website. This can be useful if you’re building multiple niche websites, managing websites for clients, or running several projects from one HawkHost account.
The process is relatively simple, but there are a few important steps beginners often miss. You need to make sure the new domain is properly connected to HawkHost, choose the correct document root, and verify that the domain appears correctly in cPanel.
In this guide, we’ll show you how to create an addon domain in HawkHost step by step. We’ll also explain what an addon domain is, how it differs from a subdomain, what to do if the domain doesn’t work, and what you should do after successfully adding it.
Quick answer: Log in to HawkHost → open cPanel → go to Domains → choose Create A New Domain → enter your domain → configure the document root → submit the form → verify that the domain appears in your domain list.
What Is an Addon Domain?
An addon domain is an additional domain that you host under an existing hosting account.
For example, suppose your primary website is:
example.comYou purchase another domain:
secondwebsite.comInstead of purchasing another hosting account, you may be able to add secondwebsite.com to your existing HawkHost account.
The second domain can have its own:
- Website files
- WordPress installation
- Email accounts
- Database
- SSL certificate
- Content
- Visitors
Conceptually, your hosting account might look like this:
HawkHost Hosting Account
│
├── example.com
│   └── Main Website
│
├── secondwebsite.com
│   └── Second Website
│
└── thirdwebsite.com
    └── Third Website
This makes addon domains particularly useful for website owners who want to manage several websites from one hosting account.
Addon Domain vs Subdomain
Before creating an addon domain, it’s important to understand the difference between an addon domain and a subdomain.
| Feature | Addon Domain | Subdomain |
|---|---|---|
| Example | secondwebsite.com | blog.example.com |
| Separate domain | Yes | No |
| Separate website | Yes | Usually |
| Requires another domain registration | Yes | No |
| Can have separate files | Yes | Yes |
| Useful for another brand/site | Yes | Usually no |
| Uses the same hosting account | Yes | Yes |
An addon domain is normally used when you want to run a separate domain and website.
A subdomain is better when you’re creating another section of an existing website.
For example:
example.com
blog.example.com
shop.example.com
These are all part of the same primary domain.
If you want:
example.com
secondwebsite.com
then an addon domain is the more appropriate setup.
Related Guide: How to Create a Subdomain in HawkHost
Before You Create an Addon Domain
Before opening cPanel, make sure you have everything ready.
Checklist
- ✅ An active HawkHost hosting account
- ✅ A registered domain name
- ✅ Access to your domain registrar
- ✅ Access to your HawkHost Client Area
- ✅ Access to cPanel
- ✅ HawkHost nameservers or DNS configuration
The most important point is that your domain must be connected to your HawkHost hosting account.
If you haven’t purchased hosting yet, start here:
Related Guide: → How to Buy HawkHost Hosting
If you’ve already purchased hosting but haven’t logged in yet:
Related Guide: → How to Log in to HawkHost
And if you haven’t accessed cPanel before:
Related Guide: → How to Access HawkHost cPanel
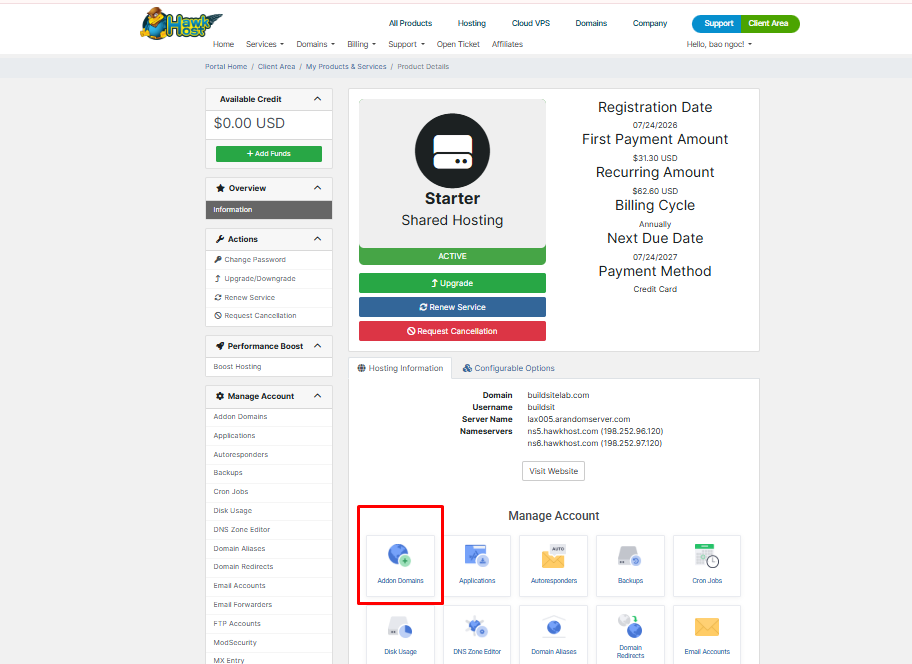
Step 1: Log in to Your HawkHost Client Area
Start by logging in to your HawkHost Client Area.
After signing in, open your hosting service and access cPanel.
For beginners, accessing cPanel through the Client Area is usually the easiest option because you don’t have to remember a separate cPanel login URL.
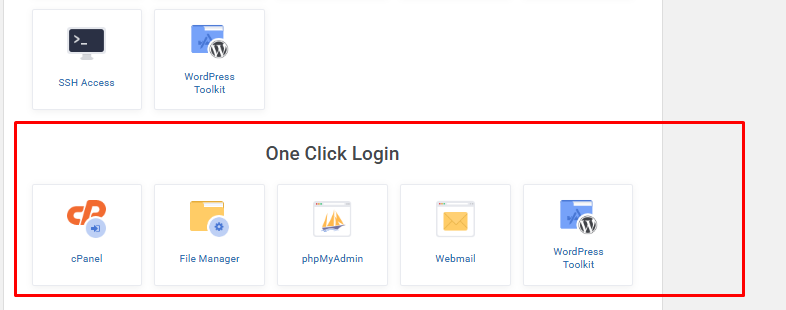
Step 2: Open cPanel
From your HawkHost hosting service page, click Login to cPanel.
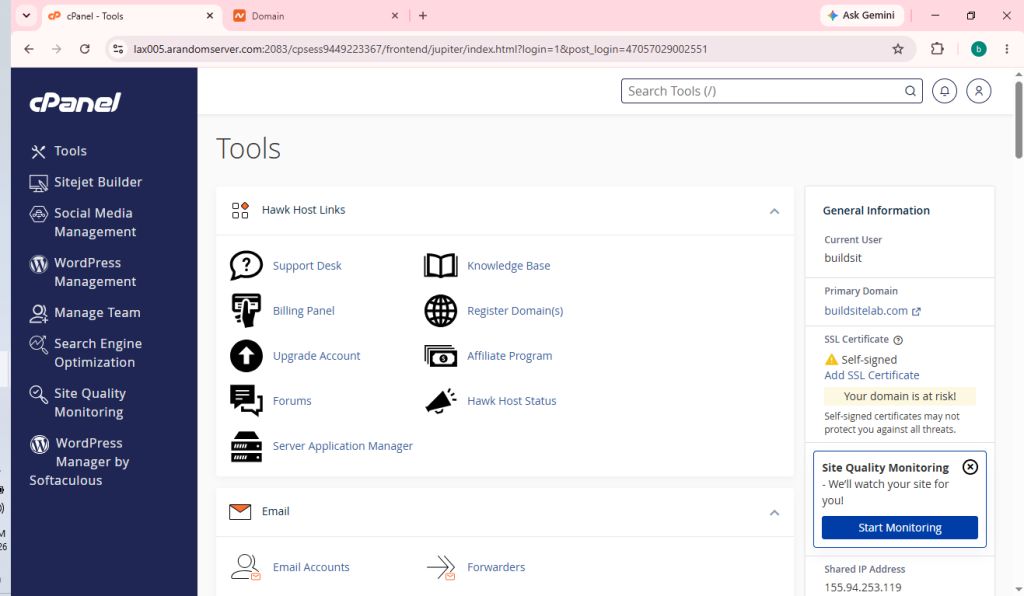
You’ll be taken directly to your cPanel dashboard.
Once cPanel loads, you’ll see a number of different sections for managing your hosting account.
Look for the Domains section.
Step 3: Open the Domains Section
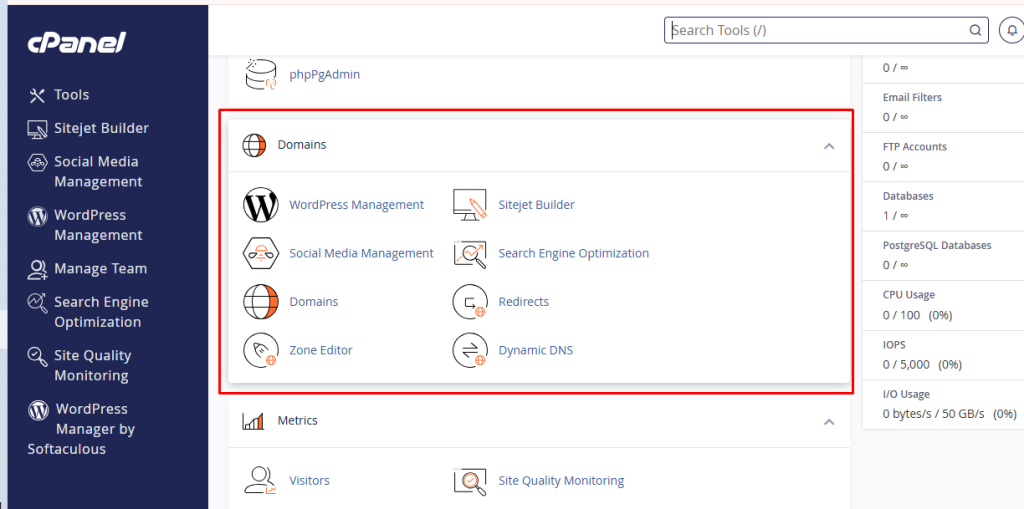
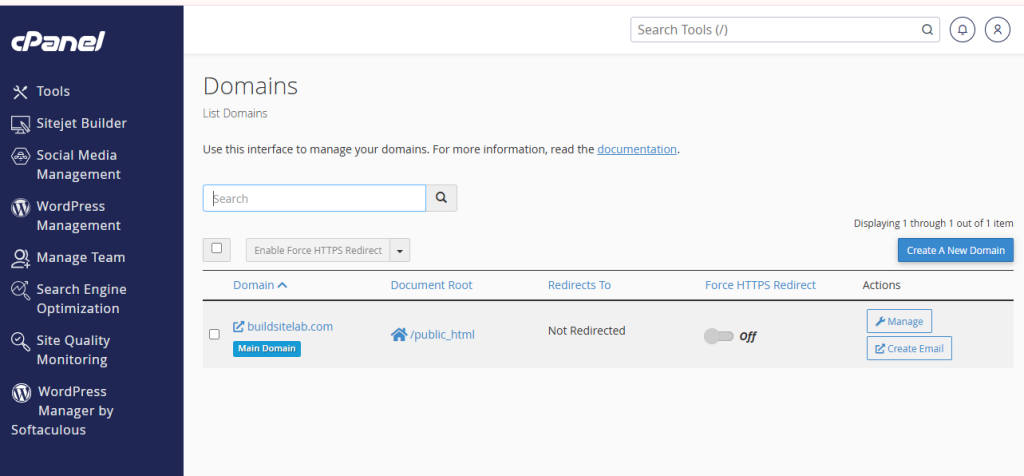
Inside cPanel, locate the Domains section.
Depending on the current version of cPanel and your HawkHost configuration, you may see an option such as:
Create A New Domain
Click that option to begin adding your domain.
Step 4: Enter Your Domain Name
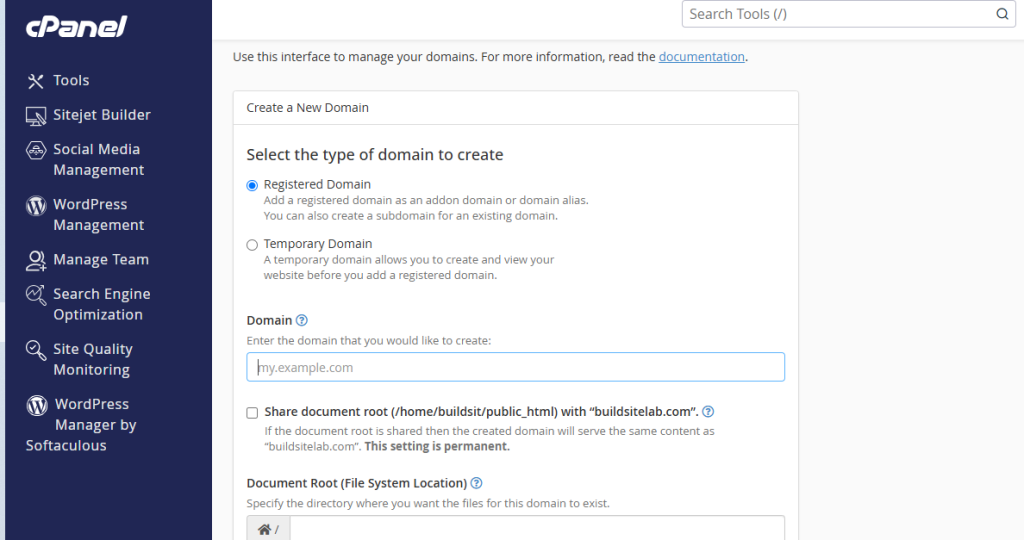
You’ll now see a form asking for the domain you want to add.
Enter your domain name.
For example:
secondwebsite.comBe careful when entering the domain.
Check that:
- The spelling is correct.
- You don’t accidentally add spaces.
- You are using the correct domain extension.
- The domain is actually registered.
If your domain is:
secondwebsite.comdon’t enter:
www.secondwebsite.comunless the current cPanel interface specifically instructs you to do so.
Step 5: Configure the Document Root
One of the most important settings when creating an addon domain is the Document Root.
The document root is the folder where the files for your new website will be stored.
For example:
/public_html/secondwebsite.comThis means that the files for secondwebsite.com will be kept inside a dedicated directory.
This is usually the cleanest setup when you’re hosting multiple websites.
Your structure might look like:
public_html/
│
├── mainwebsite/
│   └── Main Website Files
│
└── secondwebsite.com/
    └── Second Website Files
A separate document root makes it much easier to manage your websites.
You won’t accidentally upload files for one website into another site’s directory.
Tip: Use a clear folder name that makes it obvious which website the directory belongs to.
Should You Enable “Create a New Document Root”?
If the cPanel interface provides an option to create a new document root, this is generally the preferred choice when you’re adding a completely separate website.
A dedicated document root keeps your website files organized.
For example:
secondwebsite.com
        ↓
/public_html/secondwebsite.com
This is preferable to mixing the files of multiple websites in one directory.
However, don’t change the suggested document root unnecessarily unless you have a specific reason.
For a first-time WordPress installation, the default dedicated directory is usually the simplest option.
Step 6: Submit the Domain
After entering your domain and confirming the document root, submit the form.
cPanel should process the request and add the domain to your hosting account.
If everything is configured correctly, you’ll see a confirmation message.
Step 7: Verify the Domain in cPanel
After creating the domain, return to the Domains section.
You should now see your new domain in the list.
For example:
example.com
secondwebsite.com
Clicking the domain or opening its management options should allow you to review its configuration.
Check that:
- The domain name is correct.
- The document root is correct.
- The domain is active.
- There are no obvious configuration errors.
Step 8: Make Sure Your Domain Points to HawkHost
Creating the addon domain inside cPanel is only one part of the process.
Your domain must also point to your HawkHost hosting account.
If the domain is registered somewhere else, such as GoDaddy or Namecheap, you generally need to configure the domain’s DNS settings appropriately.
The simplest method for beginners is usually to use the HawkHost nameservers provided with your hosting account.
For example:
ns1.hawkhost.com
ns2.hawkhost.com
However, always use the nameservers shown in your own HawkHost account or welcome email, rather than copying nameservers from another account or an old tutorial.
Related Guide: → How to Connect a Domain to HawkHost
If you changed the nameservers recently, remember that DNS propagation can take time.
Step 9: Wait for DNS Propagation
If your domain isn’t working immediately, don’t panic.
DNS changes aren’t always visible everywhere at the same time.
Depending on the registrar, DNS provider, and cached records, propagation may take:
- A few minutes
- Several hours
- Up to 24 hours
- In some cases, longer
During this period, one device may show the new website while another still shows an old page.
This doesn’t necessarily mean you’ve configured the domain incorrectly.
Note: Avoid repeatedly changing DNS settings while waiting for propagation. Constant changes can make troubleshooting more difficult.
Step 10: Install WordPress on the Addon Domain
Once the domain has been created and connected, you’re ready to install WordPress.
Open the WordPress installer available through cPanel.
When selecting the installation domain, choose your newly created addon domain.
For example:
https://secondwebsite.comMake sure WordPress is installed into the correct document root.
After installation, you’ll have a completely separate WordPress website.
Related Guide: → How to Install WordPress on HawkHost
Step 11: Check Your New Website
After WordPress finishes installing, visit your domain:
https://secondwebsite.comYou should see your new WordPress website.
If you’ve installed a fresh WordPress installation, you’ll normally see the default WordPress site until you install a theme and start adding content.
This is the final confirmation that your addon domain, hosting, DNS, and website installation are working together correctly.
What Can You Do With an Addon Domain?
Once you’ve successfully created an addon domain, you can treat it as a separate website.
You can:
Install WordPress
Run a completely separate WordPress installation.
Create Email Accounts
Create addresses such as:
info@secondwebsite.com
support@secondwebsite.com
Install SSL
Secure the website with HTTPS.
Create Databases
Create separate databases for WordPress or other applications.
Upload Website Files
Use File Manager or FTP to upload your website.
Create Subdomains
You can also create subdomains under the addon domain.
For example:
blog.secondwebsite.com
shop.secondwebsite.com
Common Problems When Creating an Addon Domain
“Domain Already Exists”
If cPanel says that the domain already exists, check whether:
- You previously added the domain.
- The domain is already configured as an alias.
- The domain is already attached to another hosting account.
Don’t keep trying to add the same domain repeatedly.
Check the Domains section first.
Domain Doesn’t Load
If the domain appears in cPanel but doesn’t load in your browser, the problem may be DNS-related.
Check:
- Nameservers
- A records
- DNS propagation
- Domain registration status
Website Shows a Default Page
A default page may appear if the domain is correctly connected but no website files have been uploaded yet.
Check the document root and make sure your website files are located in the correct directory.
WordPress Installed in the Wrong Folder
This usually happens when the wrong document root or installation directory is selected.
Check the addon domain’s document root in cPanel and make sure WordPress is installed in the intended location.
SSL Doesn’t Work
If the domain has only recently been connected, the SSL certificate may not be ready yet.
First make sure:
- The domain points to HawkHost.
- DNS propagation has completed.
- The domain is active in cPanel.
Then check the SSL/TLS settings.
Related Guide: → How to Install Free SSL on HawkHost
Addon Domain Best Practices
If you’re planning to host multiple websites under one HawkHost account, organization becomes increasingly important.
Use Separate Document Roots
Give each website its own directory.
For example:
/public_html/site-one.com
/public_html/site-two.com
/public_html/site-three.com
This makes file management much easier.
Use Strong Passwords
Each WordPress installation should have its own administrator credentials.
Keep WordPress Updated
Regularly update:
- WordPress
- Themes
- Plugins
Keep Backups
Before making major changes, create a backup.
Monitor Hosting Resources
Multiple websites share the resources available to your hosting account.
If you host many websites, monitor:
- CPU
- RAM
- Storage
- Bandwidth
- Database usage
If your websites begin using more resources than your plan comfortably supports, consider upgrading your hosting package.
Related Guide: → HawkHost Pricing Explained
Frequently Asked Questions
What Is an Addon Domain?
An addon domain is an additional domain hosted within an existing hosting account. It can be used to create a separate website without purchasing another hosting account.
Does an Addon Domain Need Its Own Hosting Account?
No.
That’s one of the main advantages of an addon domain. If your HawkHost plan supports multiple domains, you can host additional websites under the same account.
Always check the current limits of your specific hosting plan before adding multiple websites.
Is an Addon Domain the Same as a Subdomain?
No.
An addon domain uses a separate registered domain, such as:
secondwebsite.comA subdomain uses your existing domain:
blog.example.comCan I Install WordPress on an Addon Domain?
Yes.
Once the addon domain has been created and properly connected, you can install WordPress on it just like you would on your primary domain.
Can I Create Email for an Addon Domain?
Yes, provided email hosting is included and enabled for your hosting configuration.
You can create addresses such as:
hello@secondwebsite.comthrough cPanel.
Do I Need to Change Nameservers?
Your domain needs DNS records that point it to the correct HawkHost hosting environment.
For beginners, changing the domain’s nameservers to the ones provided by HawkHost is usually the simplest approach.
If you’re using Cloudflare or another DNS provider, you may instead configure the necessary DNS records there.
How Long Does It Take for an Addon Domain to Work?
If DNS is already configured correctly, the domain may start working quickly.
If you’ve just changed nameservers, DNS propagation can take several hours and, in some cases, up to 24–48 hours.
Can I Remove an Addon Domain Later?
Yes.
You can remove an addon domain from cPanel.
However, be careful when doing so because removing a domain configuration doesn’t necessarily mean that every related file or database should automatically be deleted.
Always create a backup before removing a website.
How Many Addon Domains Can I Create?
The number depends on your HawkHost hosting plan and its current resource or domain limits.
Don’t assume that a hosting account can support unlimited websites simply because cPanel allows you to add domains.
Every website consumes resources.
Final Thoughts
Creating an addon domain in HawkHost is a straightforward way to host another website without purchasing a completely separate hosting account.
The basic process is:
Connect the domain → Open cPanel → Add the domain → Choose a document root → Verify the domain → Install WordPress → Test the website.
For beginners, the most important thing is making sure the domain’s DNS configuration points to the correct HawkHost hosting account.
Once the domain appears correctly in cPanel and DNS has propagated, you can install WordPress, configure SSL, create email accounts, upload files, and manage the new website independently.
If you’re planning to build several websites, keeping each domain in its own document root is also a good organizational practice.
What to Do Next
If you’ve successfully created your addon domain, your next step should be installing WordPress.
Recommended Guides
→ How to Install WordPress on HawkHost
→ How to Install Free SSL on HawkHost
→ How to Create an Email Account in HawkHost
→ How to Create an FTP Account
→ How to Back Up Your Website
→ How to Connect a Domain to HawkHost
→ How to Access HawkHost cPanel
If you haven’t purchased HawkHost yet, you can also review the available plans before getting started.
Ready to create your next website?
Choose a HawkHost plan that provides enough resources for all of the websites you plan to host, and check for any available promotional offers before completing your purchase.