One of the biggest advantages of WordPress is its plugin system.
Plugins allow you to add new functionality to your website without having to build everything from scratch. Depending on the plugin, you can add SEO tools, contact forms, caching, security features, analytics, image optimization, ecommerce functionality, and many other features.
For example, a basic WordPress installation might look like this:
WordPress
    ↓
Theme
    ↓
Pages + Posts
After installing plugins, you can extend it:
WordPress
    ↓
Plugins
    ├── SEO
    ├── Security
    ├── Backup
    ├── Contact Form
    └── Performance
Installing a plugin is usually straightforward. For most plugins, you can install them directly from the WordPress Dashboard.
You can also upload a plugin manually using a ZIP file when the plugin isn’t available in the WordPress plugin directory or when you’ve purchased/downloaded it from another source.
This guide explains both methods and shows what to do after installation.
What Is a WordPress Plugin?
A WordPress plugin is software that adds or extends functionality on a WordPress website.
For example, WordPress doesn’t need a plugin just to publish a basic article.
But you might install a plugin to add:
- SEO features
- Contact forms
- Caching
- Security tools
- Backups
- Image optimization
- Analytics integration
- Ecommerce functionality
- Social sharing
- Custom forms
Think of plugins as additional components that extend WordPress.
For example:
WordPress
   +
SEO Plugin
   ↓
Additional SEO Features
or:
WordPress
   +
Contact Form Plugin
   ↓
Contact Form
The important thing to remember is that not every website needs the same plugins.
Installing dozens of plugins simply because they’re available isn’t a good strategy.
What Do You Need Before Installing a WordPress Plugin?
Before installing a plugin, make sure you have:
1. A Working WordPress Website
You should already have WordPress installed.
If you haven’t installed WordPress yet, see:
or, if you’re using HawkHost:
How to Install WordPress on HawkHost
2. WordPress Administrator Access
You need an account with permission to install plugins.
Normally, you’ll access:
https://yourdomain.com/wp-adminand log in to your WordPress Dashboard.
3. A Plugin
You can obtain plugins from different sources.
For example:
- WordPress.org plugin directory
- Plugin developer websites
- Commercial plugin providers
- Plugins you’ve purchased
For security, download plugins from reputable sources and avoid suspicious or modified plugin packages.
How Many Ways Can You Install a WordPress Plugin?
There are two main methods beginners should know.
Method 1: Install a Plugin From the WordPress Dashboard
This is the easiest method.
WordPress Dashboard
       ↓
Plugins
       ↓
Add New Plugin
       ↓
Search
       ↓
Install
       ↓
Activate
Method 2: Upload a Plugin ZIP File
This method is useful when you already have a plugin ZIP file.
Plugin ZIP
    ↓
WordPress Dashboard
    ↓
Plugins
    ↓
Add New
    ↓
Upload Plugin
    ↓
Install
    ↓
Activate
For most beginners, Method 1 should be the first choice whenever the plugin is available through the WordPress plugin directory.
Method 1: How to Install a WordPress Plugin From the Dashboard
Let’s start with the easiest method.
Step 1: Log In to WordPress
Open your WordPress login page:
https://yourdomain.com/wp-adminEnter your administrator credentials.
After logging in, you’ll see the WordPress Dashboard.
Step 2: Go to Plugins
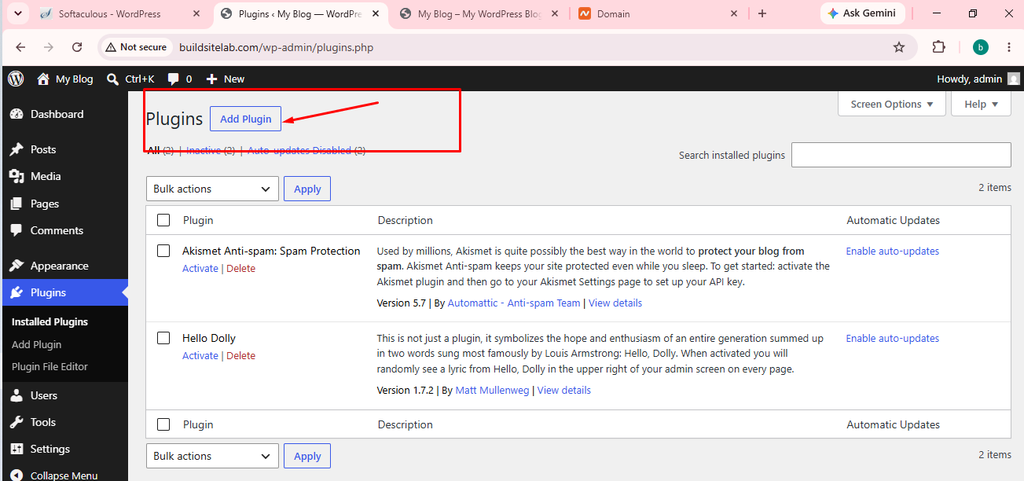
From the WordPress Dashboard, find:
Plugins
Then click:
Add New Plugin
Depending on your WordPress version, the exact wording or interface may vary slightly.
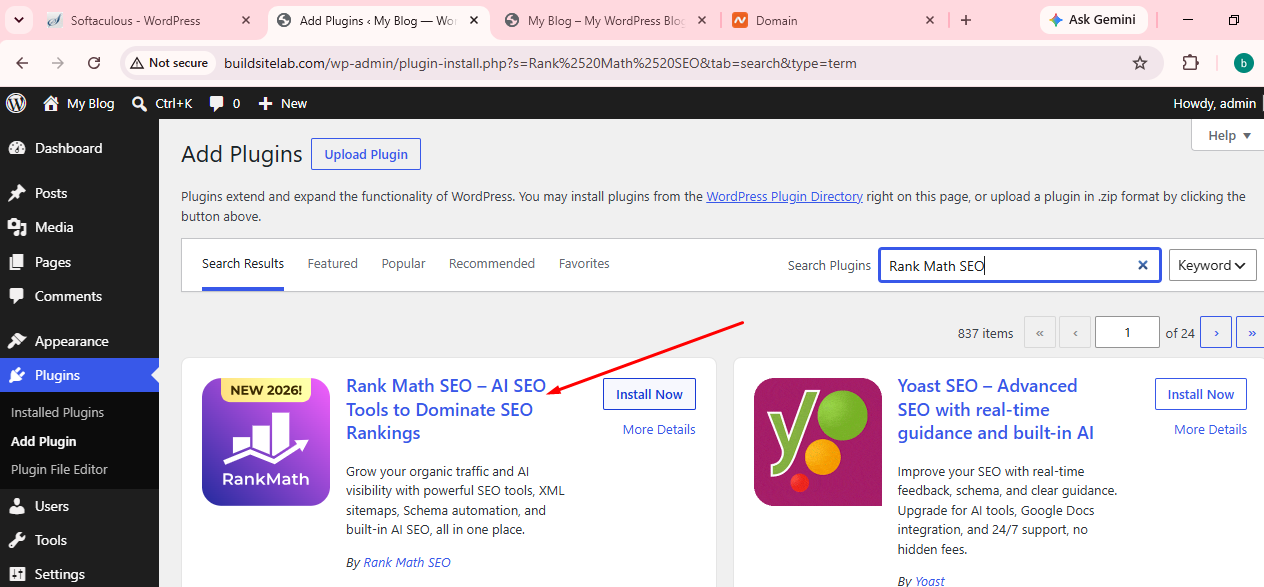
You should now see the WordPress plugin installation screen.
Step 3: Search for a Plugin
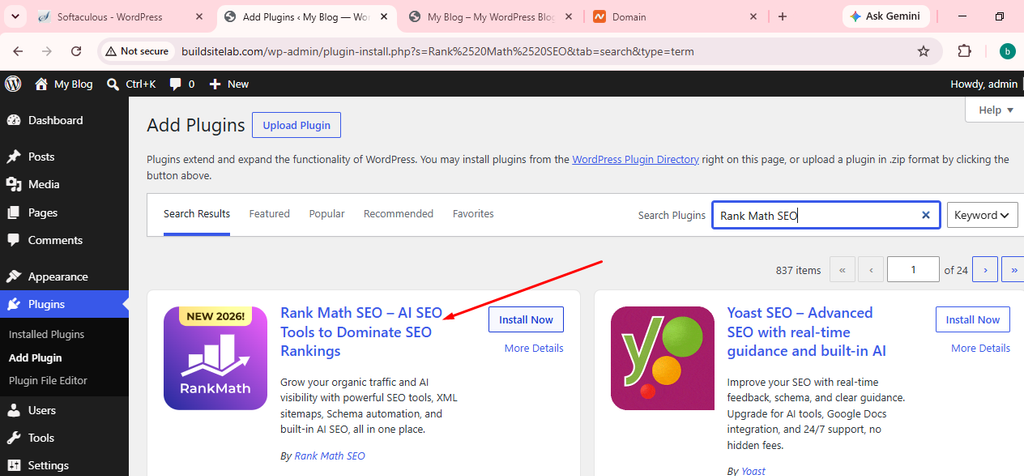
You’ll see a search field.
Enter the name or function you’re looking for.
For example:
SEOor:
contact formor the exact name of a plugin.
WordPress will display matching plugins.
Review the available options before installing one.
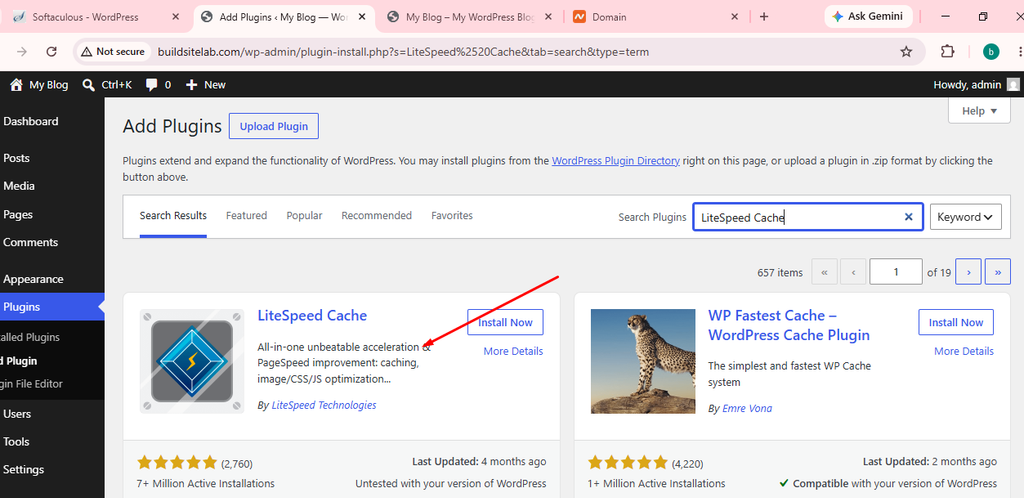
Step 4: Review the Plugin Before Installing
Don’t immediately click Install on the first result.
Look at information such as:
- Plugin name
- Developer
- Active installations
- Ratings
- Last update
- WordPress compatibility
- Description
This can help you decide whether the plugin is suitable for your website.
A plugin that hasn’t been updated for a very long time may deserve additional scrutiny.
Likewise, a plugin with poor reviews or unclear ownership should be approached carefully.
Step 5: Click Install Now
Once you’ve selected the plugin, click:
Install Now
WordPress will download and install the plugin.
The button may change to:
Installing…
Wait for the installation to finish.
Step 6: Activate the Plugin
Installing a plugin doesn’t necessarily mean it is active.
After installation, click:
Activate
The plugin is now enabled on your WordPress website.
The process is:
Search
  ↓
Install
  ↓
Activate
  ↓
Configure
These are separate steps.
Step 7: Configure the Plugin
After activation, many plugins require additional configuration.
The plugin may add a new menu item to the WordPress Dashboard.
For example:
Dashboard
Posts
Pages
Plugins
Settings
SEO
The exact configuration depends on the plugin.
Don’t assume that activating a plugin means everything is automatically configured.
Read the plugin’s documentation and review its settings.
Method 2: How to Install a WordPress Plugin From a ZIP File
Sometimes you won’t find the plugin you need through the WordPress plugin search.
For example, you may have downloaded a premium plugin as:
plugin-name.zipYou can upload that ZIP file directly through WordPress.
Step 1: Download the Plugin ZIP
Download the plugin from the developer or another trusted source.
You should normally receive a file similar to:
plugin-name.zipDon’t extract it unless the instructions from the plugin provider tell you to.
WordPress can normally accept the ZIP file directly.
Step 2: Open Add New Plugin
From your WordPress Dashboard:
Plugins → Add New Plugin
Then look for:
Upload Plugin
Step 3: Choose the ZIP File
Click:
Choose File
Select the plugin ZIP file from your computer.
For example:
plugin-name.zipThen click:
Install Now
Step 4: Wait for Installation
WordPress will upload and extract the plugin.
If the ZIP file is valid, WordPress should complete the installation.
You’ll then have the option to activate the plugin.
Step 5: Activate the Plugin
Click:
Activate Plugin
The plugin is now active.
You may then need to configure its settings.
Why Does WordPress Say “The Package Could Not Be Installed”?
One common problem occurs when the downloaded ZIP file contains another ZIP file.
For example, you might download:
plugin-package.zipand after opening it, discover:
plugin-package/
    documentation/
    license/
    plugin-name.zip
The actual WordPress plugin ZIP may be inside the downloaded package.
If WordPress says that the plugin could not be installed, check the ZIP file structure and the instructions provided by the plugin developer.
Don’t randomly upload every file inside the download package.
How to Activate a WordPress Plugin
You can also activate plugins from:
Dashboard → Plugins → Installed Plugins
Find the plugin you want to activate.
Click:
Activate
If the plugin is already active, you’ll usually see an option such as:
Deactivate
instead.
This gives you a simple way to check which plugins are currently active.
How to Deactivate a WordPress Plugin
Sometimes you may need to temporarily disable a plugin.
Go to:
Plugins → Installed Plugins
Find the plugin.
Click:
Deactivate
The plugin will remain installed but will no longer run.
This can be useful when troubleshooting.
For example:
Website problem
      ↓
Deactivate suspected plugin
      ↓
Test website
      ↓
Problem disappears?
      ↓
Plugin may be involved
Don’t immediately delete a plugin just because you want to temporarily disable it.
Deactivate it first.
How to Delete a WordPress Plugin
If you no longer need a plugin, you can remove it.
Go to:
Plugins → Installed Plugins
Then:
- Deactivate the plugin.
- Click Delete.
- Confirm deletion if prompted.
Before deleting an important plugin, check whether it stores settings or data that you may need later.
If you’re not sure, review its documentation first.
How to Update a WordPress Plugin
Plugins should be maintained and updated when appropriate.
Go to:
Dashboard → Plugins
If an update is available, WordPress may display an update notification.
You can update the plugin from the WordPress Dashboard.
Before updating an important plugin, especially on an established website, make sure you have a recent backup.
The basic workflow is:
Backup
   ↓
Update Plugin
   ↓
Test Website
   ↓
Check Important Pages
Why You Shouldn’t Install Too Many Plugins
It’s tempting to install a plugin for every small feature.
However, this can make your website more difficult to manage.
More plugins can mean:
- More updates
- More configuration
- More potential conflicts
- More maintenance
- More things to troubleshoot
This doesn’t mean you should avoid plugins.
Instead, install plugins because you have a specific need.
A good approach is:
Need a feature?
      ↓
Can WordPress do it natively?
      ↓
If not → Find a suitable plugin
      ↓
Check developer + updates + reviews
      ↓
Install
      ↓
Configure
How to Choose a WordPress Plugin
Before installing a plugin, consider several factors.
1. Is It From a Trusted Source?
Prefer plugins from reputable developers and established marketplaces or directories.
Avoid plugins from unknown websites offering suspiciously modified premium plugins.
2. Is It Updated?
Check when the plugin was last updated.
An actively maintained plugin is generally preferable to one that has been abandoned.
3. Does It Have Good Reviews?
Reviews can provide useful information about other users’ experiences.
However, don’t rely on ratings alone.
Look at the plugin’s update history, support, documentation, and developer reputation too.
4. Does It Actually Solve Your Problem?
Don’t install a complicated plugin when a simple feature is all you need.
Choose the smallest and most appropriate solution for your website.
WordPress Plugin vs Theme
Beginners sometimes confuse plugins and themes.
Theme
Controls the presentation and design of your website.
Theme
   ↓
Design
Layout
Typography
Colors
Templates
Plugin
Adds functionality.
Plugin
   ↓
SEO
Forms
Security
Backup
Performance
Features
A simple way to remember it is:
Theme = how your website looks.
Plugin = what your website can do.
Common WordPress Plugin Installation Problems
Plugin Installation Button Is Missing
If you don’t see the option to install plugins, your WordPress user account may not have sufficient permissions.
Check whether you’re logged in with an administrator account.
Some managed WordPress environments may also restrict plugin installation.
“Destination Folder Already Exists”
This can happen if WordPress detects that a plugin folder with the same name already exists.
Possible causes include:
- The plugin was previously installed
- A previous installation failed
- The plugin directory wasn’t completely removed
Check:
Plugins → Installed Plugins
before attempting another installation.
“The Plugin Does Not Have a Valid Header”
This error can occur if the uploaded ZIP doesn’t contain the actual WordPress plugin files in the expected structure.
Check whether you uploaded the correct plugin ZIP.
If you downloaded a package containing documentation, licenses, and several files, the actual plugin ZIP may be inside that package.
Plugin Causes a White Screen or Error
If your website breaks immediately after activating a plugin, the plugin may conflict with:
- Another plugin
- Your theme
- Your WordPress version
- Your PHP environment
- Another piece of website code
First, try deactivating the plugin.
If the website returns to normal, investigate the plugin conflict.
Plugin Causes a WordPress Error
If the problem happens immediately after activation, deactivate the recently installed plugin and test again.
If you’re unable to access the WordPress Dashboard, your hosting control panel may provide tools such as File Manager that can help you disable a problematic plugin manually.
This is one reason why knowing how to access your hosting account and cPanel is useful.
you can read more:
How to Access HawkHost cPanel
Should You Install Free or Premium WordPress Plugins?
Both can be useful.
Free Plugins
Advantages:
- No upfront cost
- Easy to test
- Many options available
- Often sufficient for basic websites
Premium Plugins
Advantages may include:
- More advanced features
- Premium support
- Additional integrations
- More customization options
However, premium doesn’t automatically mean better.
Choose the plugin based on:
- Features
- Reliability
- Updates
- Support
- Compatibility
- Developer reputation
What to Do After Installing a Plugin
After activating a plugin, don’t immediately forget about it.
Use this checklist:
- Plugin activated
- Settings reviewed
- Plugin configured
- Website tested
- Important pages tested
- Plugin documentation checked
- Backup available
- Future updates monitored
For important plugins, keep track of what the plugin does and why you installed it.
This makes your website much easier to maintain later.
WordPress Plugin Installation Checklist
Before finishing, use this quick checklist:
Before Installation
- WordPress is working
- Administrator access available
- Plugin comes from a trusted source
- Plugin is compatible with your setup
- Recent backup available
Installation
- Open Plugins → Add New
- Search for plugin or upload ZIP
- Install plugin
- Activate plugin
After Installation
- Configure plugin
- Test website
- Check important pages
- Confirm plugin is working
- Keep plugin updated
- Remove plugins you no longer need
Frequently Asked Questions
How do I install a plugin in WordPress?
Log in to your WordPress Dashboard, go to Plugins → Add New Plugin, search for the plugin, click Install Now, and then click Activate.
Can I install a WordPress plugin without coding?
Yes.
You don’t need to know how to code to install most WordPress plugins.
The WordPress Dashboard provides a graphical interface for installing, activating, updating, and deleting plugins.
How do I install a WordPress plugin from a ZIP file?
Go to:
Plugins → Add New Plugin → Upload Plugin
Select your plugin ZIP file, click Install Now, and then activate the plugin.
Why can’t I install a plugin?
Possible reasons include:
- Your account doesn’t have administrator permissions.
- Plugin installation is restricted by your hosting environment.
- The uploaded ZIP isn’t a valid WordPress plugin package.
- The plugin is incompatible with your WordPress setup.
- A plugin with the same folder already exists.
Should I deactivate a plugin before deleting it?
Yes, in normal circumstances you should deactivate the plugin first and then delete it.
This lets you test the website without the plugin before removing its files.
How many plugins should I install on WordPress?
There is no universal maximum number.
The goal isn’t to keep the number as low as possible. Instead, install only plugins that provide a genuine function you need and maintain them properly.
A well-maintained website with several useful plugins can be better than a website with fewer but poorly maintained plugins.
Are WordPress plugins safe?
Plugins from reputable sources can be safe, but no plugin should be treated as automatically risk-free.
Before installing one, check its developer, update history, reviews, documentation, and compatibility.
Avoid pirated or modified plugin packages from untrusted sources.
Conclusion
Installing a WordPress plugin is usually a simple process.
For plugins available through the WordPress plugin directory, the normal workflow is:
Log in to WordPress
       ↓
Plugins
       ↓
Add New Plugin
       ↓
Search for Plugin
       ↓
Install Now
       ↓
Activate
       ↓
Configure
If you have a plugin ZIP file, use:
Plugins
   ↓
Add New Plugin
   ↓
Upload Plugin
   ↓
Choose ZIP
   ↓
Install Now
   ↓
Activate
The installation itself is only one part of plugin management. You should also check the plugin’s quality before installation, configure it correctly, keep it updated, maintain backups, and remove plugins you no longer need.
For a new WordPress website, avoid installing plugins simply because they look useful. Start with the functionality you actually need and build your plugin stack gradually.
3 thoughts on “How to Install a WordPress Plugin: A Complete Step-by-Step Guide”