If you have just installed WordPress, one of the first things you will see is the WordPress Dashboard.
At first, the dashboard can look confusing. There are menus for posts, pages, media, plugins, themes, users, settings, tools, and many other features. If you are new to WordPress, you may not know what each section does or which settings you actually need to use.
The good news is that you do not need to understand everything in the dashboard at once.
The WordPress Dashboard is simply the administration area where you manage your website. From here, you can publish content, change your website design, install plugins, manage users, update WordPress, configure settings, and monitor important information about your site.
In this guide, we will explain the WordPress Dashboard step by step, including what each menu does, how to navigate the dashboard, which settings beginners should configure, and how to use the dashboard efficiently.
What Is the WordPress Dashboard?
The WordPress Dashboard is the administrative control center of your WordPress website.
Visitors see the front end of your website, while you use the dashboard to manage the back end.
You normally access the dashboard by visiting:
You then log in using your WordPress administrator account.
Once logged in, you will see the dashboard interface.
Depending on your WordPress version, theme, plugins, and user permissions, the exact appearance of your dashboard may be slightly different.
Plugins can also add new menus and settings to the dashboard.
For example, installing an SEO plugin may add an SEO menu, while an eCommerce plugin can add products, orders, and store management options.
How to Log In to the WordPress Dashboard
To access your dashboard, open your WordPress login page.
The most common address is:
You may also use:
Enter your username or email address and password.
After successful authentication, WordPress will take you to the Dashboard.
If you cannot log in, check that you are using the correct credentials and website URL. If you forgot your password, use the password recovery option on the login page.
WordPress Dashboard Layout
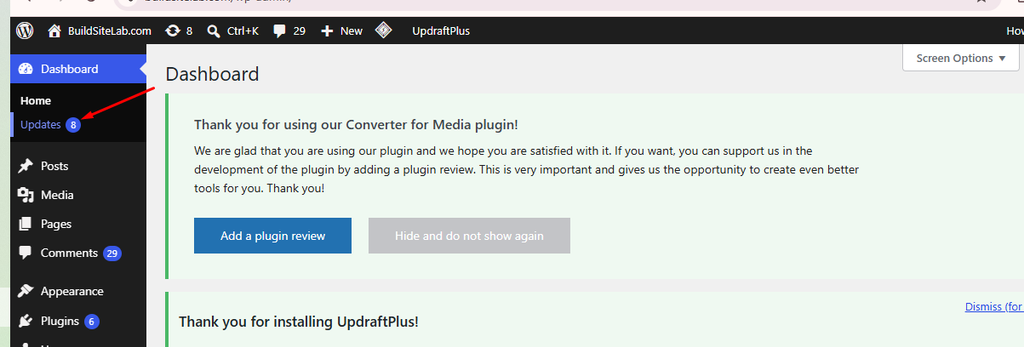
The WordPress Dashboard is generally divided into several important areas:
- Top toolbar
- Left navigation menu
- Main dashboard area
- Screen options
- Help section
- User profile menu
Understanding these areas will make WordPress much easier to use.
1. The WordPress Admin Toolbar
The toolbar appears across the top of the WordPress administration screen.
It provides quick access to several common functions.
Depending on your configuration, you may see:
- WordPress logo
- Site name
- Updates
- Comments
- New content
- User profile
- Search
- Plugin notifications
Site Name
Clicking your site name can take you from the dashboard to the front end of your website.
This is useful when you want to quickly check how your website looks to visitors.
Updates
The update icon lets you know when updates are available.
Updates may include:
- WordPress core updates
- Plugin updates
- Theme updates
- Translation updates
Keeping your WordPress installation updated is an important part of website maintenance.
If you are new to WordPress, you can also read our guide on How to Update WordPress to learn how to update your website safely.
New Content
The plus icon or New menu provides shortcuts for creating:
- Posts
- Pages
- Media
- Users
The exact options can vary depending on your installed plugins.
User Profile
Your profile menu allows you to edit your account information and log out of WordPress.
You can also access your profile from the Users section.
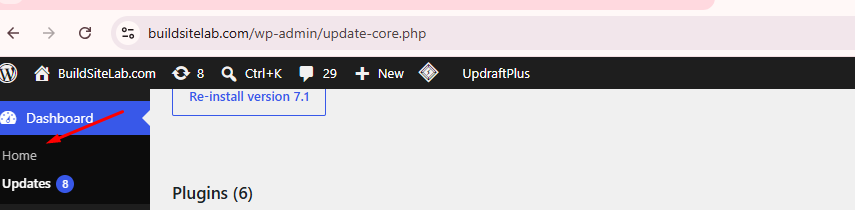
2. Dashboard Home
When you first log in, WordPress usually takes you to:
Dashboard → Home
This is the main overview screen.
You may see several dashboard widgets, including:
- At a Glance
- Activity
- Quick Draft
- WordPress Events and News
- Site Health Status
Plugins may also add their own widgets.
At a Glance
The At a Glance section gives you a quick overview of your website.
It can show information such as the number of:
- Posts
- Pages
- Comments
It may also display your current WordPress version and active theme.
This section is useful when you want a quick snapshot of your website.
Activity
The Activity widget can display recent publishing activity and comments.
You can use it to quickly see what has recently happened on your website.
Quick Draft
Quick Draft allows you to write a short draft directly from the dashboard.
This is useful when you have an idea for an article but do not want to create the complete post immediately.
Enter a title, write a few notes, and save the draft.
You can return to the draft later from the Posts section.
Site Health Status
WordPress includes a Site Health feature that can help identify technical issues.
It can provide information about:
- Security
- Performance
- Updates
- PHP configuration
- Database
- HTTPS
- WordPress configuration
You should occasionally review your Site Health status, particularly if you are experiencing technical problems.
3. Posts
The Posts section is where you manage blog posts and other regularly published content.
The main options usually include:
- All Posts
- Add New Post
- Categories
- Tags
All Posts
This page displays your existing blog posts.
You can:
- Edit posts
- Delete posts
- View drafts
- Search posts
- Filter posts
- Bulk edit posts
Add New Post
Click Add New Post when you want to create a new article.
Modern WordPress uses the Block Editor, which allows you to build content using blocks.
You can add:
- Paragraphs
- Headings
- Images
- Videos
- Lists
- Buttons
- Quotes
- Tables
- Columns
The available blocks can be expanded by plugins.
Categories
Categories help organize related posts.
For example, a technology website might have categories such as:
- WordPress
- SEO
- AI Tools
- Digital Marketing
A good category structure makes your website easier to navigate.
Tags
Tags provide another way to describe your content.
Unlike categories, tags are generally more specific.
For example, an article about WordPress hosting could use tags such as:
- WordPress hosting
- Web hosting
- Website setup
- WordPress beginner
Do not create dozens of unnecessary tags. Use them when they genuinely help organize your content.
4. Media
The Media section contains files uploaded to your WordPress website.
Go to:
Media → Library
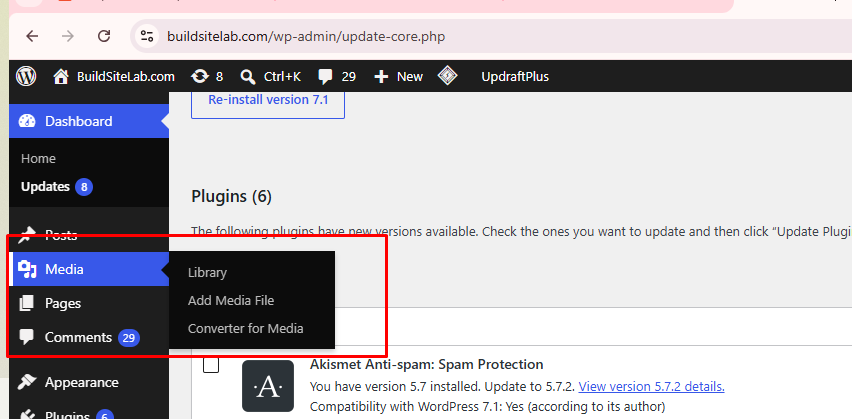
You can manage:
- Images
- Videos
- Audio
- PDFs
- Documents
- Other supported files
You can upload files directly to the Media Library or upload them while editing a post or page.
Why Media Management Matters
Large images can slow down your website.
Before uploading images, consider:
- Compressing them
- Choosing appropriate dimensions
- Using modern image formats when appropriate
- Adding descriptive alternative text
- Avoiding unnecessarily large files
Good media management can improve both website performance and accessibility.
5. Pages
The Pages section is used for relatively permanent website content.
Common pages include:
- Home
- About
- Contact
- Privacy Policy
- Terms and Conditions
- Services
The difference between posts and pages is mainly how they are intended to be used.
Posts are usually time-based content such as blog articles.
Pages are generally used for important evergreen sections of your website.
Go to:
Pages → Add New Page
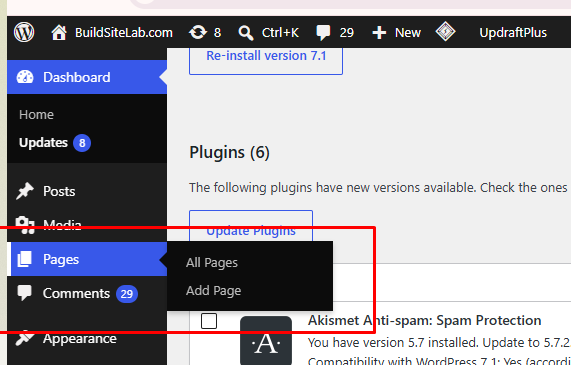
to create a new page.
6. Comments
If comments are enabled on your website, the Comments section allows you to manage visitor comments.
You can:
- Approve comments
- Reply to comments
- Edit comments
- Mark comments as spam
- Delete comments
Comment management can become important as your website grows.
Spam comments are common on public websites, so consider using appropriate spam protection if you enable comments.
7. Appearance
The Appearance section controls many aspects of your website’s design.
Depending on your theme, you may see options such as:
- Themes
- Editor
- Customize
- Widgets
- Menus
- Theme File Editor
The available options depend on the theme you are using.
Themes
Go to:
Appearance → Themes
to install, activate, deactivate, or delete themes.
If you are new to WordPress, our guide How to Install a WordPress Theme explains the process step by step.
Editor
Modern block themes may use the WordPress Site Editor.
The Site Editor allows you to customize areas such as:
- Header
- Footer
- Navigation
- Templates
- Styles
- Pages
Customize
Some classic themes use the Customizer instead.
It can provide options for:
- Colors
- Fonts
- Logo
- Header
- Footer
- Homepage
- Menus
The exact options depend on your theme.
8. Plugins
Plugins add functionality to WordPress.
Go to:
Plugins → Installed Plugins
to view your installed plugins.
You can:
- Activate plugins
- Deactivate plugins
- Delete plugins
- Update plugins
- View plugin information
To install a new plugin, go to:
Plugins → Add New Plugin
You can search for plugins from the WordPress plugin directory or upload a plugin ZIP file.
Examples of plugin categories include:
- SEO
- Security
- Backup
- Caching
- Contact forms
- Analytics
- eCommerce
Avoid installing plugins simply because they look interesting.
Every additional plugin can introduce another component that needs to be maintained.
Install plugins that provide functionality you actually need.
9. Users
The Users section allows you to manage people who have access to your WordPress website.
You can create different user accounts and assign roles.
Common WordPress roles include:
- Administrator
- Editor
- Author
- Contributor
- Subscriber
Each role has different permissions.
For example, an administrator has extensive control over the website, while a subscriber has very limited permissions.
Do not give administrator access to someone unless they genuinely need it.
Using appropriate user roles is an important security practice.
10. Tools
The Tools section contains various utilities for managing your WordPress website.
Depending on your installation, you may see options such as:
- Import
- Export
- Site Health
- Export Personal Data
- Erase Personal Data
Plugins can also add their own tools.
The Import and Export features can be useful when moving or transferring certain types of WordPress content.
11. Settings
The Settings section contains many of the fundamental configuration options for your website.
Common settings include:
- General
- Writing
- Reading
- Discussion
- Media
- Permalinks
- Privacy
General Settings
You can configure:
- Site Title
- Tagline
- WordPress Address
- Site Address
- Administration Email
- Language
- Time Zone
- Date Format
- Time Format
Review these settings after installing WordPress.
Reading Settings
Reading settings determine how your homepage displays content.
You can choose between:
- Your latest posts
- A static page
A blog may use the latest posts as its homepage, while a business website may use a custom static homepage.
Discussion Settings
These settings control comments and discussion features.
You can configure options related to:
- Comment approval
- Notifications
- User registration
- Comment moderation
Media Settings
Media settings control some default image sizes generated by WordPress.
You can review these settings if you need to control how WordPress handles uploaded images.
Permalink Settings
Permalinks control the structure of your website URLs.
A clean URL structure is important for usability and can also help search engines understand your content.
For many content websites, the Post name structure is a simple choice.
For example:
is easier to understand than a URL containing only a numerical post ID.
12. The Screen Options Menu
Some WordPress admin pages include a Screen Options button.
This feature lets you choose which dashboard elements are visible.
For example, on certain pages you may be able to hide:
- Columns
- Widgets
- Excerpts
- Categories
- Tags
If your dashboard looks crowded, check Screen Options and hide elements you do not need.
This can make the WordPress administration area easier to navigate.
13. The Help Menu
Some WordPress administration pages include a Help tab.
It provides contextual information about the screen you are currently viewing.
If you are unsure what a particular WordPress setting does, check the Help section before changing it.
14. Plugin Menus
One thing that often confuses beginners is that installing a plugin can change the dashboard.
For example, an SEO plugin may add an SEO menu.
A security plugin may add a Security menu.
An eCommerce plugin may add:
- Products
- Orders
- Customers
- Payments
This means your WordPress dashboard can look very different from another website.
That is completely normal.
The more plugins you install, the more dashboard menus you may have.
How to Keep Your WordPress Dashboard Organized
As your website grows, the dashboard can become crowded.
You can keep it organized by following a few simple practices.
Remove Unnecessary Plugins
Delete plugins you no longer use instead of leaving them installed indefinitely.
Remove Unused Themes
Keep your active theme and any essential fallback theme, but remove old themes you do not need.
Limit Plugin Notifications
Some plugins display promotional notifications in the dashboard.
Where appropriate, configure them so that your administration area remains focused on important information.
Use User Roles
If multiple people manage your website, give each person the minimum permissions they need.
Keep WordPress Updated
Regular updates can improve security and compatibility.
If you are unsure about the update process, follow a reliable WordPress update procedure and create a backup before major changes.
WordPress Dashboard vs. Website Front End
It is important to understand the difference between the dashboard and the front end.
The dashboard is where you manage your website.
The front end is what visitors see.
For example, when you create a blog post in:
Dashboard → Posts → Add New
you are working on the back end.
When a visitor opens that article on your website, they are viewing the front end.
You can usually switch between the two by clicking your site name in the admin toolbar.
WordPress Dashboard Tips for Beginners
If you are new to WordPress, do not try to learn every menu immediately.
Start with the areas you will use most frequently:
- Dashboard
- Posts
- Pages
- Media
- Appearance
- Plugins
- Users
- Settings
- Updates
These sections cover most of the everyday tasks involved in running a basic WordPress website.
As your website grows, you will naturally become familiar with additional tools.
Avoid Changing Settings Without Understanding Them
WordPress contains many powerful settings.
Changing the wrong setting can sometimes affect your website.
For example, changing your website URL incorrectly can make the site difficult to access.
Before changing an important setting, understand what it does and create a backup when appropriate.
Keep Your Dashboard Simple
You do not need every plugin available.
A simple WordPress installation with a reliable theme, essential plugins, regular backups, and good security practices is often easier to maintain.
Frequently Asked Questions
How do I access my WordPress Dashboard?
Visit your website’s /wp-admin URL and log in with your WordPress account.
For example:
What is the difference between WordPress Dashboard and WordPress Admin?
The terms are often used interchangeably.
The Dashboard technically refers to the main administration screen, while WordPress Admin can refer more broadly to the entire back-end management area.
Why does my WordPress Dashboard look different?
Your dashboard can change depending on your WordPress version, theme, installed plugins, user role, and hosting environment.
Can I customize the WordPress Dashboard?
Yes. You can customize parts of the dashboard by using Screen Options, user settings, plugins, and other WordPress tools.
Why are there so many menus in my WordPress Dashboard?
Plugins and themes can add their own menus.
For example, an eCommerce plugin may add product and order management, while an SEO plugin may add SEO settings.
Can I hide WordPress Dashboard widgets?
Yes. On supported dashboard screens, click Screen Options and disable widgets you do not want to see.
Final Thoughts
The WordPress Dashboard is the central control panel for managing your website.
Although it may look complicated when you first log in, most beginners only need to understand a handful of sections.
Posts are used for blog content, Pages are used for permanent website content, Media manages uploaded files, Appearance controls your site’s design, Plugins add functionality, Users manages accounts, and Settings controls important website configurations.
The Dashboard also gives you access to updates, Site Health, comments, tools, and other administrative features.
You do not need to master every option immediately. Start with the features you use regularly and learn the more advanced sections as your website grows.
Once you understand the WordPress Dashboard, many other WordPress tasks become much easier. You will be able to install themes and plugins, publish content, configure your website, perform updates, and manage your site with much more confidence.